

Adobe’s “out of memory” error is every video editor’s worst nightmare, but what does it actually mean, and why does it happen?
The “out of memory” error in Premiere Pro appears when your memory is full and is typically caused by excessive media cache or insufficient RAM being allocated to the app. Clearing your media cache is the quickest and easiest way to fix this error.
Several other issues have also been known to make the dreaded error surface. Below we detail seven common causes and simple fixes you can use when Premiere Pro is out of memory:
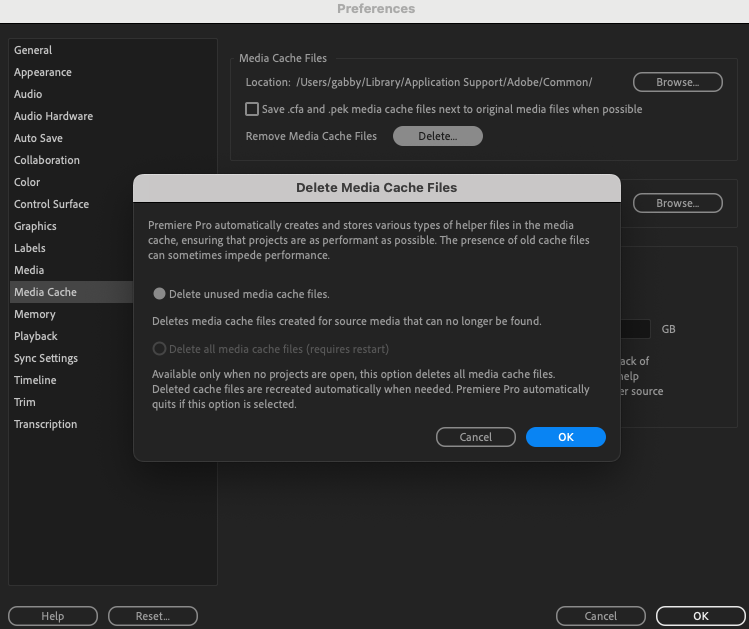
1. Delete your media cache
Premiere pro automatically creates cache files from your media. A cache file acts as a computer’s short-term memory, storing reduced-quality duplicates of your frequently used files to boost retrieval speed. The problem posed is that after a while they build up and hog all of your memory storage.
To prevent your cache from getting too packed, it’s essential to regularly clean out your media cache. Here’s a quick guide on how to do it:
- Go to the Premiere Pro Tab located at the Top Left of your screen.
- Choose Preferences from the pop-up list.
- Head to the Media Cache Tab.
- Click on the Delete button to get rid of unnecessary cache files.
- Close the program and then try reloading your project.
BONUS TIP: You can set up automatic media cache clearing under Media Cache Management.
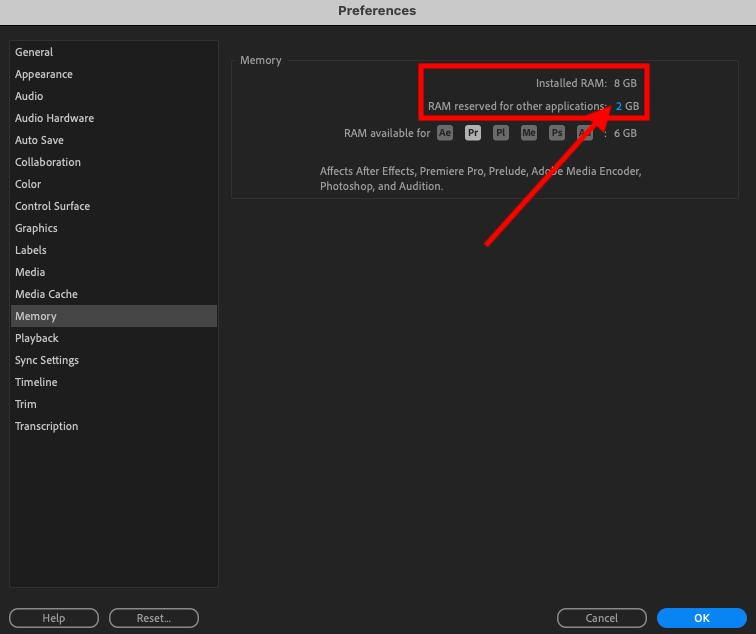
2. Allocate enough RAM
In order to run smoothly, Premiere Pro relies heavily on RAM (Random Access Memory). If it doesn’t have enough RAM allocated, you’ll encounter the ‘out of memory’ error. Adjusting the memory settings to give Premiere Pro more access to RAM can prevent this error from occurring.
Premiere Pro will operate with only 8GB of RAM but it’s recommended to have at least 16GB for optimal performance. You can find the latest Adobe Premiere Pro System Requirements here.
To adjust your allocated RAM:
- Tap the Premiere pro button at the top left of your screen.
- Scroll down and hit Preferences
- Navigate to the Memory tab
- Click on the number next to ‘RAM reserved for other applications’ and type in your desired amount. Remember the maximum amount you can allocate is your ‘installed RAM” number which is shown above.
- To save your changes, hit Ok.
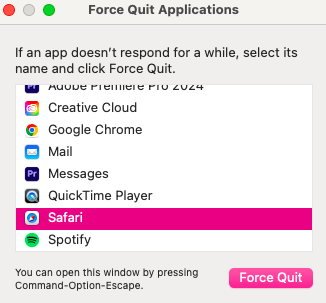
3. Close down other apps
Close all other applications when using Premiere Pro to ensure optimal performance. Since Premiere Pro demands significant RAM, shutting down competing programs prevents resource conflicts, contributing to a smoother editing experience without slowdowns or potential glitches.
You can quickly shut down any unnecessary background programs through your task manager. To access your task manager follow the steps below:
For Mac users
Press CMD + ALT + ESC simultaneously to access and force quit specific applications.
For Dell users
Press CTRL + SHIFT + ESC together to open the Task Manager.
4. Upgrade your memory
If you’re a full-time content creator or video editor, it’s crucial to assess whether your current system meets the premiere pro minimum software requirements. While the minimum RAM for Premiere Pro is 8GB, it’s advisable to aim for at least 16GB for optimal performance.
Upgrading your RAM can significantly enhance your editing experience and ensure smoother operation of Premiere Pro, especially when working on resource-intensive projects.
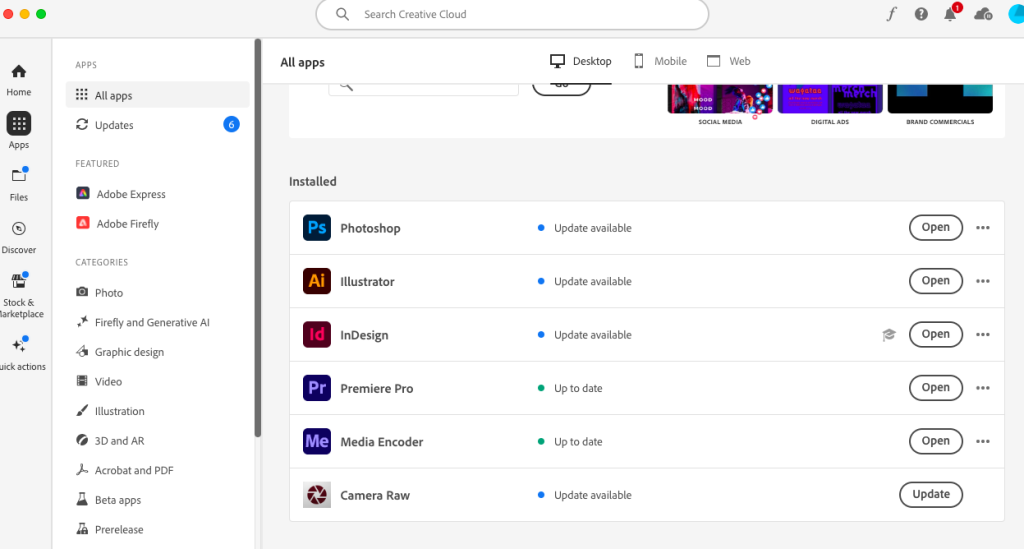
5. Check your software version
Occasionally, Premiere Pro encounters bugs. To address this, Adobe developers frequently release updates containing bug fixes and performance enhancements.
Make sure to keep an eye on your Creative Cloud app for updates. To check, head to the ‘all apps’ page. If there’s a newer version available, you’ll spot it marked with a blue dot and ‘update available’.
6. Delete your rendered files
Adobe stores your rendered files in a dedicated folder, and over time, these files can accumulate, occupying a significant portion of your memory storage. Deleting unnecessary rendered files is an effective method to reclaim storage space and eliminate the ‘out of memory’ error message.
To delete your rendered files:
- Tap the Sequence button located at the top of your screen.
- Scroll down to ‘Delete render files’
7. Move files to external drive
To prevent your internal storage from filling up, the best step you can take is to organize and store files on an external drive. Transfer as many files as you can from your internal drive to an external one by simply dragging and dropping them between the drives. This helps free up space and ensures your system has ample storage for smooth operation.
Here are 5 preventive steps you can take to avoid your Premiere Pro running out of memory:
1. Render Sequence changes
Frequently rendering your sequence changes as you work on a project can help reduce the amount of memory storage you use in premiere pro.
Adobe incorporates a smart feature in your timeline that color-codes clips—yellow indicates real-time playback capability, red signifies a lack of real-time playback due to numerous effects. After rendering, these clips transition to a green color in your timeline.
To render sequence changes:
- Hit the Sequence button in the Project panel.
- Press the enter key. Premiere pro will automatically render any red labeled clips.
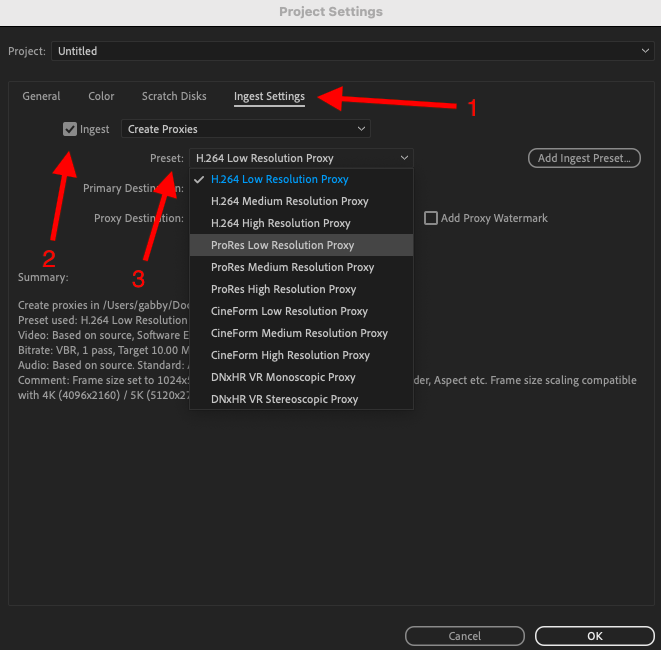
2. Use Proxies
Work with proxies for large files. Proxies are scaled-down versions of your media, easing the burden on your system and avoiding crashes. Using proxies in Adobe Premiere Pro is a straightforward process.
To setup proxies:
- Tap File > Project Settings > Ingest Settings.
- Check the Ingest box and choose Create Proxies from the dropdown list.
- Pick your preferred “Preset.”
- Now, Media Encoder will automatically generate proxies for any raw footage you import into Premiere Pro.
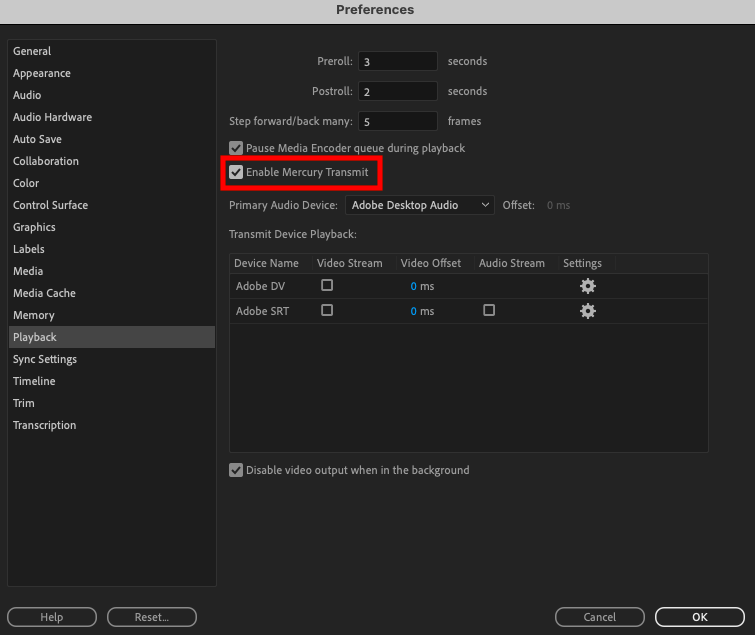
3. Disable Mercury Transmit
Mercury Transmit is a feature within Premiere Pro that enhances video playback by redirecting output to external monitors. It is particularly valuable for professional video editing as it ensures precise color representation and efficient monitoring.
However it is known to trigger the out of memory error. If you are not working with external monitors then you can turn mercury transmitting off to increase software performance and avoid premiere pro running out of memory.
You can disable mercury transmit using the following steps:
- Click the Premiere Pro button
- Scroll to Preferences
- Select the Playback tab
- Untick the checkbox next to Enable Mercury Transmit.
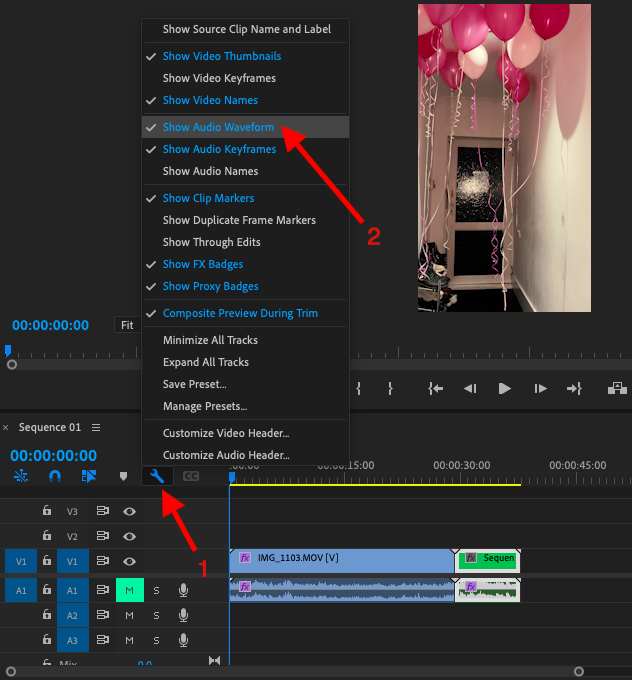
4. Turn off Waveform
The waveform graph in your timeline displays volume changes, serving as a visual representation of audio signals. It’s useful for syncing audio and spotting silent parts in your video, but it can contribute to your memory storage depleting sooner.
If you are not leveraging the waveform graph then you can turn this off to save memory storage space.
To turn Waveforms off:
- Click on the small wrench icon to open menu
- Unselect the tick next to Show Audio waveform
5. Check for memory leaks
A memory leak is a programming error where a computer program fails to release memory it no longer needs, causing a gradual accumulation of unused memory. Over time, this can lead to unresponsiveness and eventually drain your memory storage.
There is no foolproof way to completely avoid this but to minimize the risk you should consistently close Premiere Pro after use and actively monitor your storage space.
