

Are your YouTube playlists vanishing into thin air?
Some YouTube playlists have reportedly disappeared from both search results and the sidebar. Although the YouTube Team has acknowledged the issue, a resolution remains elusive. The precise cause is unknown, with multiple factors suspected, such as exceeding the maximum playlist limit, utilizing an outdated YouTube app, accumulating excessive cache, relying on browser extensions, or neglecting optimized titles and descriptions.
You can resolve the problem by clearing your browser and YouTube app cache, updating the YouTube app, and/or restarting your device. However, due to the various potential causes, fixing it isn’t always straightforward. In the following sections, we outline several methods to address the issue of YouTube playlists not showing up.
Clear Your Browser Cache
Browser cache is the temporary storage in your browser for keeping copies of web page elements such as images and scripts. It’s designed to speed up your webpages loading time by using the locally stored files instead of downloading them every time you visit a site.
However, if your cached data becomes corrupted or overfilled, then it can cause issues like playlists not showing on YouTube. Clearing your Browser’s cache data is very simple. See below for the instructions on how to clear cache data in different browsers:
Google Chrome
- Open Google Chrome
- Navigate to the three dots at the top right of the screen and click.
- Select the “Clear Browsing Data” button.
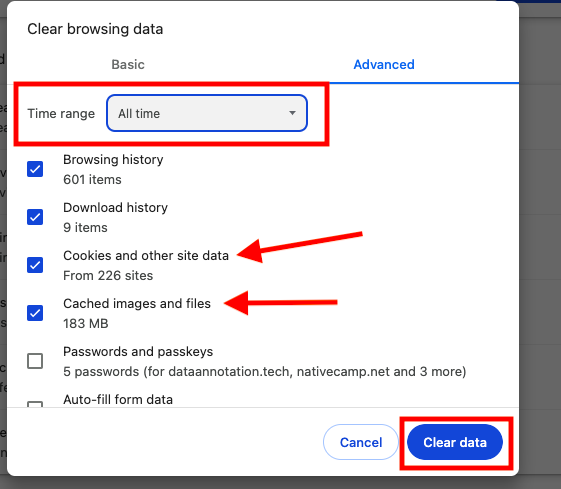
- Toggle to the advance page and change the drop down to “All Time”.
- Make sure that ‘Cached image and files’ and “Cookies and other site data” is ticked.
- Save your changes by clicking ‘Clear Data’.
Safari
- Launch safari
- Navigate to the Safari button at the top of your left hand side of the screen and click.
- Click the Preferences button.
- Go to the privacy page.
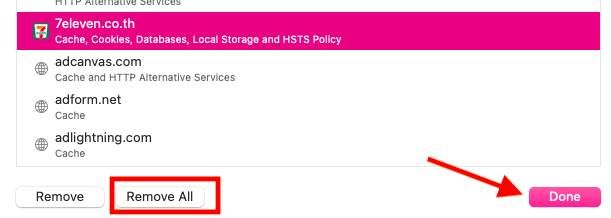
- Click the ‘Manage Websites Data’ button. A list will appear with all the websites that your device has stored data for. You can individually select sites you wish to remove data for or you can use the remove all button to remove all website data.
- Click Done.
Restart Your Device
Restarting your device can often resolve errors such as the playlists disappearing, by refreshing your system settings and clearing temporary glitches.
If you are using a Computer/Laptop:
- Save any work you have open and then close all active applications.
- Click your PC’s “Start” or “Apple” menu.
- Choose “Restart” or “Shut Down.”
- Allow your computer to power off completely before turning it back on.
- Open your web browser, visit YouTube, and check for the playlists.
If you are using a Mobile (iOS/Android):
- Unlock your device.
- Press and hold the power button.
- Select “Restart” or “Reboot” from the menu.
- Wait a few moments for your device to restart.
- Launch the YouTube app and verify if the playlists are now visible.
Log Out and Back into Your YouTube account
Logging in and out of your youtube account can sometimes be a simple fix to eradicate any account issues. Youtube is available in different mediums so below we have listed the steps on how to log in and out on different platforms.
Web Browser:
- Launch your web browser.
- Open Youtube.
- Log out of your account by clicking your profile photo, and clicking sign out.
- The Youtube homepage will reload. Click the Sign in button in the top right corner.
- Sign into your account by selecting your google account and inputting your password.
Youtube App:
- Launch the YouTube app.
- Log out of your account then tap “Sign In” if not already signed in.
- Enter your login details.
Clear Your YouTube Cache
YouTube cache is the temporary storage of data on your device. It ensures that your videos load faster by storing information locally. However, if overtime your account complies too much cache it may cause issues like your playlists not showing.
Regularly clearing your cache can help your youtube account fetch the latest data from YouTube’s servers.
To clear your YouTube Cache on a Web Browser:
Google Chrome:
- Open Chrome and go to YouTube.
- Press `Ctrl+Shift+Delete` (Windows/Linux) or `Command+Shift+Delete` (Mac) to open the “Clear browsing data” menu.
- Select “Cached images and files” and ensure other options are unchecked unless you want to clear other data.
- Click “Clear data.”
To clear your YouTube Cache on a Mobile Device:
Android (Google Chrome):
- Open the Chrome app and go to YouTube.
- Tap the three dots in the upper right corner.
- Select “History” and then “Clear browsing data.”
- Check “Cached images and files” and tap “Clear data.”
iOS (Safari):
- Open the Settings app on your iPhone or iPad.
- Scroll down and tap on Safari.
- Scroll down and tap “Clear History and Website Data.”
- Confirm your choice by tapping “Clear History and Data.”
To Clear your YouTube Cache on a Smart TV or Streaming Device:
Smart TVs (Samsung, LG, etc.):
- Load up the YouTube app on your TV.
- Go to the app settings or options.
- Look for an option related to cache or temporary files.
- Follow the on-screen instructions to clear the cache.
Ensure your Youtube is Up to Date
he YouTube team consistently releases app updates to address bugs and enhance performance. If you’re experiencing issues like missing playlists, updating to the latest version of the app is likely to resolve these issues.
- Launch your App Store.
- Go to the Apps page.
- Any Apps that have an available update will appear at the top of the page wit an ‘Update’ button.
Disable Browser Extensions
Browser extensions can sometimes cause conflict with Youtube causing your playlists to not appear. If you suspect that your browser extension is the problem then you can disable it by using the following steps:
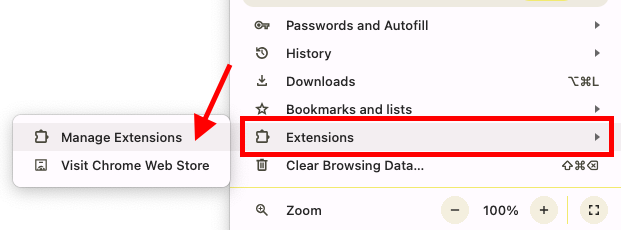
Google Chrome:
- Open Google Chrome.
- In the top-right corner, click on the three vertical dots to open the menu.
- Hover over “More tools” in the menu.
- In the submenu, click on “Extensions.”
- Alternatively, you can type `chrome://extensions/` in the address bar and press Enter.
- Find the extension you want to disable and toggle the switch next to it to the off position (gray).
Safari (Mac):
- Open Safari.
- In the top menu, click on “Safari.”
- Select “Preferences.”
- Go to the “Extensions” tab.
- Find the extension you want to disable and uncheck the box next to it to disable it.
After disabling an extension, it is usually a good practice to refresh the webpage or restart the browser to apply the changes. If you ever need to enable the extension again, simply revisit the same menu and toggle the switch back to the on position.
Rename to Optimize the Playlist Title and Description
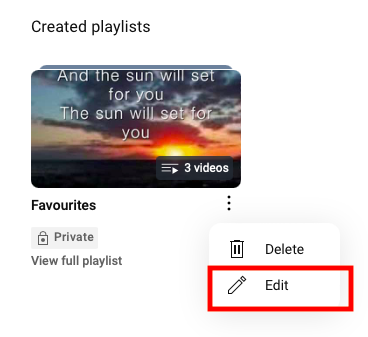
- Launch Youtube and go to Your Channel and click Manage Videos.
- Tap the Playlists button.
- Hover over the playlist name until the pencil icon appears called “Details”.
- Evaluate how well your current playlist title and description relates to your desired keyword. Use Chat GPT if you need help improving your title and description.
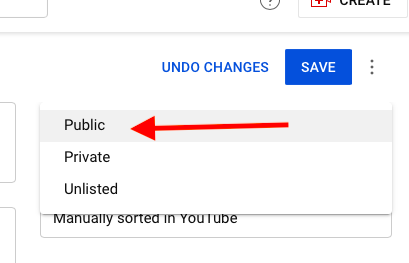
Change your Privacy Settings
- Open Youtube and go to Your Channel and click Manage Videos.
- Tap the Playlists button.
- Hover over the playlist name until the icons appear. Click the pencil icon called “Details”.
- Make sure that your Playlist Visibility is set to Public not Private or Unlisted.
Contact Youtube Support Team
If none of the above fixes bring back your playlists then you should consult the Youtube Help page or contact the Youtube Support Team. To contact the Youtube Support Team:
- Visit the Youtube Help Center
- Look through the Browse Help Topics list, if no guides can assist you then go to the Community page.
- Post a Question to the Help Community. Make sure to write clear and detailed answers for each question step. Confirm and post once done.
