Home Blog Page 2

PS5 No Signal No Safe Mode: How To Fix It?

0

Do you want to play your favorite game on your PS5 console, but it displays “No Signal,” and no Safe Mode menu shows up on the screen when you try to boot it?

If your PS5 displays the “No Signal” message and no Safe Mode menu appears, its SDD is corrupted, or there is a connection issue between the TV and the console. To fix this, check the HDMI cable at the back of your TV and console for any damage and replace it if needed. If this fails, replace the PS5 storage drive with a new compatible M.2 NVMe SSD.

In this article, we’ll discuss why your PS5 shows “No Signal” and no Safe Mode menu displays on the screen when you try to boot the console. We’ll also provide some easy-to-follow steps to resolve this problem quickly. 

Why won’t my PS5 go to Safe Mode and show no signal?

ps5 console

Here are some of the reasons why your PS5 displays the “No Signal” message, and no menu shows up when you attempt to boot it into Safe Mode:

  • Corrupt SSD installed on the console.
  • Faulty HDMI connection.
  • PS5 hardware problem.
  • Screen resolution mismatch between the console and TV.
  • Incorrect TV input source.
  • PS5 conflicts with other devices connected to the TV.

What to do when PS5 shows no signal and won’t enter Safe Mode?

fix PS5 shows no signal and won’t enter Safe Mode

If you boot your PS5 and it shows a “No Signal” message and no Safe Mode menu pops up on the display, try these methods below: 

Power Cycle PS5

The first and quickest solution to fix this issue is to power cycle your console. Doing so will resolve any minor system glitches that are causing your PS5 to display the “No Signal” message and not go into the Safe Mode. 

To do this:

  • Unplug the power cable of your PS5 from the main power supply unit.
  • Wait 2-3 minutes to discharge any residual power.
  • Plug PS5 back into the mains.

Press the “Power” button on your PS5 to turn it on and confirm the fix. 

Select the Right Input Source on The TV

It might be possible that you’ve selected the wrong input source on your TV. For this reason, when you connect your PS5 to the TV and power it on, the screen displays the “No Signal” error and won’t go into Safe Mode when you boot the console.

To fix this, simply press the “Input” button on your TV’s remote, select the right HDMI input source, and press “Enter” to confirm your selection. Once you do that, power on your PS5 and verify if this fixes the problem for you.

Disconnect Other Devices

Sometimes, conflicting signals from other devices connected to your TV may cause this problem.

To troubleshoot this, disconnect all other devices (such as your set-top box or PS4) from your TV, reconnect your PS5, and verify that you can boot into safe mode. 

Check the HDMI Connection

A faulty or defective HDMI connection between your TV and PS5 is often the culprit behind the “No Signal” or the beeping issue. The same reason also prevents the PS5 from entering into the Safe Mode. 

Your best bet here is to inspect the HDMI cable connected to your TV and console for any visible damage. If the HDMI cable is faulty, replace it with a new 2.0 or the original one.

Another reason can be that the HDMI ports at the back of your PS5 and TV are damaged. So, check the ports carefully and replace them by contacting a qualified technician.

NOTE: If you use an HDMI capture card, splitters, or switchers to connect your console to the TV, it also interferes with the connection and results in the “No Signal” issue. So, make sure to connect your PS5 and TV directly with the HDMI cable.

Change the TV Resolution

Sometimes, the mismatch between the PS5 and TV resolution also leads to the “No Signal” issue on the console and prevents it from booting into Safe Mode.

To fix this, change your TV resolution to the one set on your PS5 by following these steps:

Samsung:

  • Go to “Settings.”
  • Select “Display & Sound.”
  • Choose “Advanced Display Settings.”
  • Choose “Resolution.”
changing TV resolution
  • Select the resolution that is set on your PS5 or toggle on “Auto Switch to Best Resolution.”

LG:

  • Head to “Settings.”
  • Choose “All Settings.”
  • Choose “Picture.”
  • Select “Picture Mode Settings.”
  • Select “Advanced Controls” or “Picture Options.”
  • Choose “Super Resolution.”
  • Choose “Off.”

Sony:

  • Open “Settings.”
  • Choose “Display & Sound.”
  • Select “Screen.”
  • Select “Wide Mode.”
  • Choose “Normal” or “Auto.”

After changing the resolution on the TV, turn on your PS5 and check if the problem persists.

Install a New SSD

The SSD in your PS5 often gets corrupted or bricked, due to which the console displays the “No Signal” message on the TV and fails to enter Safe Mode.

Your only option here is to install a new SSD in your PS5 this way:

  • Buy a PS5-compatible M.2 NVMe SSD.
  • Turn off your PS5 and disconnect all the cables connected to it.
  • Remove PS5 casing. 
  • Unscrew the cover on the expansion slot and remove the screw & spacer.
  • Adjust the spacer as per the size of M.2 SSD.
  • Align the SSD with the notch expansion connector.
  • Lean the SSD diagonally upward and place it into the expansion connector.
  • Tilt the M.2 NVMe SSD down in its slot and fasten the screws.
Installing SSD in PS5
  • Attach the expansion slot and casing back on your PS5.

Plug in all the cables to your PS5, connect it to the TV, and hopefully, this problem won’t bother you now.

Contact the PlayStation Support Team

If none of the above methods helped you solve the issue, contact the PlayStation Support team via:

Once you get in touch with the team, provide all the necessary details about the issue. They may be able to offer specific solutions tailored to your situation. 

If your PS5 is under warranty, the Support team may also offer to repair or replace it for you. 

Conclusion 

In this article, we’ve explained why your PS5 shows the “No Signal” message and why there is no safe mode menu upon booting. We’ve also explored the steps you can take to troubleshoot the issue quickly.

Hopefully, your PS5 functions normally again after you’ve fixed it by accessing the safe boot menu.

PS5 Beeping But Not Turning On – 7 Solutions

0

PS5 is the current-generation home video gaming console, but many users report that it is beeping but not turning on despite their multiple efforts.

If your PS5 is beeping but not turning on, it might not be getting enough power or is overheating due to dirt build-up in its internal components. To fix this, unplug your console from the power source and firmly reconnect it. If this fails, clean the inside of your PS5 using a can of compressed air to resolve overheating problems. 

In this article, we’ll explain why your PS5 gaming console is beeping but not turning on and in what ways you can sort out this persistent problem quickly.

Why is my PlayStation 5 beeping but not turning on?

PS5 not turning on

If your PS5 gaming console is beeping but not turning on, one of the following might be the reason for this annoyance:

  • Power supply failure.
  • An issue with the PS5 system software.
  • PS5 overheating. 
  • Defective HDMI ports and cables.
  • Dirt buildup in the internal components of the console.
  • Pressed or stuck power button.

What to do when your PS5 beeps but won’t turn on?

What to do when your PS5 beeps but won’t turn on?

If your PS5 is beeping but not turning on, these 7 easy-to-follow solutions will help you quickly resolve this problem.

Correctly Plug PS5 to Power Source

Your PS5 console might not be plugged in correctly to the power supply unit. This results in the console not getting enough power to turn on and beeps when you press the “Power” button.

To fix this, unplug your PS5 from the power source, wait 30 seconds to discharge any residual power, and firmly reconnect the console to the mains. You can also try using another power switch to troubleshoot power supply issues at the mains. 

Now, press the “Power” button and confirm whether your PS5 turns on.

NOTE: Do inspect the PS5 power cable and AC adapter for any fault, as it can also prevent your console from turning on. If the power cable or adapter is defective, replace it with a new one. 

Check the Power Button

It is also possible that the “Power” button on your PS5 is pressed or stuck. For this reason, your gaming console beeps but won’t turn on. 

To fix this, gently press and release the “Power” button multiple times to see whether it returns to its normal state. In case you notice any debris or foreign objects around the button, use a can of compressed air to remove it and check if this resolves the problem. 

Check the HDMI Port and Connection

If the HDMI connection between your PS5 and TV/display is faulty, it also results in the console beeping but failing to turn on. 

To verify this reason, inspect the HDMI cable connected to your console for any wear & tear and replace it with a new one. 

Also, check the ports at the back of your PS5 and TV to see whether they are defective. If yes, you may need to replace them with the help of a qualified technician.

Boot PS5 to Safe Mode and Restart

Many users report that booting the console into safe mode and restarting it fixed the issue. Here’s how:

  • After connecting the controller to PS5, Press & hold “Power” for a few minutes. 
  • Quickly release the “Power” button when you hear a second beep. 
  • Press “PS” on controller. 
  • Choose “Restart PS5” and verify if your PS5 is turning on now without any beeps coming out of it.
Restarting PS5 in Safe Mode

If this doesn’t help, format your USB drive as a FAT32 file system. Afterward, do these steps to update your PS5 system software to the latest version and resolve this frustrating issue:

  • Go to the “PS5 System Software Update” page using a browser on your computer.
  • Find and click “PS5 Console Update File.”
  • Insert the USB drive into your PC and create a folder named “PS5.”
  • Create another folder inside “PS5” and rename it as  “UPDATE.”
  • Now, rename the downloaded “PS5 Console Update File” as “PS5UPDATE.PUP.”
  • Move the file to the “Update” folder on the USB drive.
  • Eject your USB drive from the computer and connect it to your PS5.
  • Boot your PS5 in Safe mode.
  • Press “X.”
  • Choose “Update System Software.”
  • Choose “Update from USB Storage Device.”
  • Select “OK.”

Wait for the update process to complete, restart your PS5, and verify the fix. 

Insert Optical Disk Into the Console

Some users who have the Standard PS5 Edition suggest that inserting the Ultra HD Blu-ray optical disc into the console also helped them troubleshoot this problem. Here’s how:

  • Clean the PS5 optical disc drive using a clean microfiber cloth.
  • Place your PS5 in a vertical orientation.
  • Put the disc into your PS5 optical drive (make sure the top side is pointing to the left).

Press the “Power” button on your PS5 until you hear the beeping sound and see whether the console turns on.

Clean the Console

If your PS5 is overheated, the console will beep when you press the “Power” button but won’t turn on due to built-in safety mechanisms. So, let the gaming console unplugged for 20 minutes to let it cool down and ensure it is placed in a well-ventilated area.

Sometimes, dirt buildup on the internal components of your PS5 also overheats it quickly. 

To fix this, you need to clean the inside of your gaming console with these instructions:

  • Disconnect all the cable connections from your console and wait 30-40 seconds.
  • Open the casing of your PS5 gaming console.
  • Use a can of compressed air to blow out any dirt and debris from the components.
  • Put some isopropyl alcohol on a microfiber cloth and gently wipe the entire console.
  • Let your console dry for a few minutes, and hopefully, it will turn on this time. 
cleaning PS5 using can of compressed air

Consult a Technician

Have you tried all the above solutions, but your PS5 is still beeping and not turning on? The internal power supply unit or motherboard of the console might be faulty or defective. 

In such cases, it is recommended to consult a qualified technician for a thorough examination of your PS5. They can diagnose any underlying issue with the hardware and repair the gaming console for you.

Fortnite Won’t Update PS5 – Reasons & Fixes

0

Fortnite is an intense survival game where 100 players compete with each other to be the last one standing, but some gamers report that it won’t update on their PS5 gaming console no matter what they try.

If Fortnite won’t update to the latest version on your PS5, the cache data on your console is corrupt, or there is not enough free space on it to downland the game updates. To fix this, boot your console to Safe Mode and clear the cache data. If this fails, delete unnecessary games or apps from the PS5 and try updating Fortnite again. 

In this article, we’ll explore why Fortnite won’t update on your PS5 gaming console and in what ways you can swiftly address this issue at hand.

Why Fortnite won’t update on my PS5?

Why Fortnite won’t update on my PS5?

If Fortnite won’t update on your P5 gaming console, one of the following might be the reason for this issue:

  • Corrupt PS5 cache data.
  • Corrupt Fortnite game date or installation files.
  • Insufficient disk space on the console.
  • Internet connectivity issues.
  • PS5 system glitches.
  • Outdated PS5 system software.
  • Epic Games server outage. 

How do I get Fortnite to update on my PS5?

How do I get Fortnite to update on my PS5?

If Fortnite won’t update on your PS5 gaming console, these 8 simple and easy fixes will help you get rid of this persistent problem in no time.

Restart PS5

Restarting your PS5 is often the simplest solution to resolve any minor glitches that are preventing Fortnite from updating on your console. To restart your console:

Using the Controller:

  • Press & hold “PS.” (on the controller)
  • Select “Power.”
  • Choose “Restart PS4.”

By Unplugging the Console:

  • Disconnect your PS5’s power cable from the wall socket.
  • Wait 30-40 seconds. 
  • Reconnect your console back to the power source.

Now, try updating Fortnite to verify whether the problem recurs.

Clear Cache in Safe Mode

Some PS5 users suggest that clearing the PS5 system cache data in the Safe Mode also helped them fix the update issue in Fortnite. Here’s how:

  • Connect your PS5 controller to the console using the USB cable.
  • Press “Power” for three seconds to turn off the console.
  • Press & hold “Power” for 7 seconds and release it when you hear the second beep. 
  • Next, press “PS” on the controller. 
  • Choose “Clear Cache and Rebuild Database.”
  • Choose “Clear System Software Cache.”
  • Select “OK.”

Your PS5 will take some time to clear the cache and restart the system. After that, proceed with updating Fortnite to verify the fix. 

If clearing the cache doesn’t help, reboot your PS5 to the Safe Mode and rebuild the database this way:

  • Choose “Clear Cache and Rebuild Database.” 
  • Select “Rebuild Database.”
  • Select “OK.”

Your console will rebuild a new database of all the content on the system. Once your PS5 reboots itself, your game should update! 

Free Up Space On PS5

If your PS5 is running low on storage space, Fortnite might not be able to download and install the necessary update files. As a result, the update process is interrupted and won’t be completed on your console. 

To address this problem, free up some storage space on your PS5 by deleting unnecessary games or apps this way:

  • Open PS5 “Settings.”
  • Choose “Storage.”
  • Choose “Console Storage.”
  • Select “Games and Apps.”
  • Select “Delete Content.”
  • Choose the data you want to delete; select “Delete.”
deleting games on PS5

Once you free up enough space on your console, check if you can update Fortnite now.

Resolve the Internet Connectivity Issues

Fortnite new updates are usually heavy files due to new features, fixes for bugs, and other game data. 

Therefore, the update process requires a stable internet download and upload speed to install the files on your console. Otherwise, it will start over again or fail to download on your PS5. 

To address this problem, run a speed test on your network and do these steps to get your connection up to par:

  • Restart/Rest your router. 
  • Move your PS5 console closer to the router for better Wi-Fi signal coverage. 
  • Disconnect all unnecessary devices connected to your Wi-Fi network to free up some bandwidth. 
  • Connect your PS5 directly to the router via an Ethernet cable. 

Restore Licenses

Another solution to get Fortnite to update on your PS4 or PS5 is to restore licenses on your console with these steps:

  • Open console “Settings.” 
  • Choose “Users and Accounts.” 
  • Select “Other.”
  • Select “Restore Licenses.”

Afterward, try updating Fortnite to the latest version to confirm whether this helps with the issue. 

Clear Fortnite Saved Game Data

Fortnite stores your progress and other game information in the “Saved Data” section of your PS5. When this data gets corrupt or outdated, it leads to failed updates, game freezes, or unexpected errors.

To resolve this issue, clear the Fortnite saved game data on your PS5 by following these instructions: 

  • Open PS5 “Settings.”
  • Choose “Storage.”
  • Select “Console Storage.”
  • Select “Saved Data.”
  • Choose “PS5 Games.”
  • Select “Fortnite.”
  • Select “Delete.”
  • Choose “OK.”
deleting Fortnite saved data on PS5

Now, go back and see whether Fortnite can update to the latest version on your PS5 this time.

If this doesn’t work, uninstall the game from the console to remove any corrupt game files and reinstall a fresh, updated copy. 

Update PS5

Fortnite may require the latest PS5 system software to run smoothly and install the new update. However, if your console is outdated, the game may fail to install and download new updates due to compatibility issues.

To prevent this, update your PS5 to the latest version with the steps given below: 

  • Open “Settings.”
  • Select “System.”
  • Select “System Software.”
  • Choose “System Software Update and Settings.”
  • Select “Update System Software.”
  • Choose “Update.”

When the gaming console finishes updating itself, try updating Fortnite, and hopefully, the problem won’t bother you anymore. 

NOTE: Check the Epic Game server for any outages. If the server is down, wait for the developer team to get everything back online, and after that, Fortnite should update. 

Conclusion

In this article, we’ve explained why Fortnite won’t update on your PS5 and how you can fix this problem quickly. 

Hopefully, you can now continue playing your favorite game with all its latest features and content on your gaming console without any interruptions. 

However, if the problem still persists, contact Fortnite Support to report it. They might be able to provide you with a more advanced or specific solution. 

Fortnite Crash When Joining Party – Reasons & Fixes

0

Fortnite has introduced fun virtual locations in the game where you can hang out with friends and make new ones, but some players report they experience a crash when joining a party chat on their PC or gaming console. 

If Fortnite crashes when you are joining a party, your graphics card installed on your computer might be outdated. To fix this, download the latest version of your graphics card driver from the manufacturer’s website. If Fortnite crashes when joining a party on a gaming console, update its software and clear the Fortnite saved data from the storage.

In this article, we’ll discuss why Fortnite crashes when joining a party and what steps you can take to quickly overcome this problem.

Why does Fortnite crash when joining a party?

Man enjoying video game

Here are some reasons why Fortnite crashes when you are joining a party on your computer or gaming console:

  • Outdated graphics card driver.
  • Outdated system software on gaming consoles.
  • Corrupt Fortnite game files on your console or PC.
  • Minor bugs in the game’s code that is causing a glitch.
  • Outdated Fortnite game files.

How do I stop Fortnite from crashing when joining a party?

Woman gaming

If Fortnite is often crashing when you are joining a party, try the following 6 proven solutions.

Restart the Game

The first solution to troubleshoot the issue is to restart the game on your gaming console (Xbox, PS4, or PS5) or computer. This will resolve any bugs that are causing Fortnite to glitch when joining a party. Here’s how:

PC: 

  • Press “Win+X.”
  • Click “Task Manager.”
  • Right-click “Epic Games Launcher.”
  • Choose “End Task.”
Force closing Fortnite on PC

PS4 and PS4: 

  • Press “PlayStation” (on the controller).
  • Highlight “Fortnite.”
  • Press “Options.”
  • Press “X.”
  • Choose “Close Game.”

Xbox:

  • Press “Xbox” to open the guide.
  • Highlight “Fortnite.”
  • Press “Menu.”
  • Choose “Quit.”

Afterward, relaunch “Fortnite” on your device and see if the problem persists.

IMPORTANT: Ensure that your PC system meets the minimum requirements to run Fortnite. Otherwise, the game will crash when you try to join a party. 

Update Graphic Card Driver

Many gamers who have installed NVIDIA graphics cards on their computers complain about Fortnite crashing problems while joining a party. This may happen if the graphics card drive is outdated.

To fix this problem, update the NVIDIA graphic card driver to the latest version on your computer by following these steps: 

  • Go to the NVIDIA website, download the “Nvidia GeForce Experience,” and install it on your PC.
  • Open “Nvidia GeForce Experience.”
  • Go to the “Drivers” tab.
  • Click “Check For Updates.”
  • Select “Download.”
  • Select the installation type to proceed with updating the graphic card.

Next up, restart your computer, open “Fortnite,” and try joining a party world.

Delete the CrashReportClient File

Some users report that deleting the CrashReportClient files on their computer also helped them resolve the crashing issue on Fortnite when joining a party. 

To do this:

  • Open “File Explorer.”
  • Go to “Drive C or D.”
  • Search for the “Program Files.”
  • Select “Fortnite.”
  • Go to “Engine” > “Programs.”
  • Right-click “CrashReportClient.”
  • Choose “Delete.”

Once you delete the file, relaunch Fortnite on your PC and verify the fix. If this doesn’t work, delete the DXCache file in File Explorer this way:

  • Choose “LocalAppData” under “Program Files.”
  • Go to “NVIDIA.”
  • Right-click “DXCache.”
  • Choose “Delete,” and that’s it!

NOTE: Overclocking settings on your computer also lead to in-game instability in Fortnite and cause it to crash when you join a party. So, make sure to reset the overclock settings on your PC.

Clear Fortnite Game Saved Data

The Fortnite saved game data on your computer or gaming console sometimes gets corrupted or outdated. Due to this, Fortnite faces issues while fetching the game data and crashes when you are joining a party chat during the battle.

To verify the Fortnite game data on your PC, do these steps:

  • Open “Epic Games Launcher.”
  • Go to the “Epic Games Library.”
  • Find “Fortnite.”
  • Click the three dots.
  • Choose “Manage.”
  • Choose “Verify.”

Wait for the validation process to complete and see whether Fortnite still crashes on your computer.

If you are playing Fortnite on your gaming consoles (PS5, PS4, or Xbox), follow these steps to clear the Saved Data.

PS4: 

  • Open PS4 “Settings.”
  • Select “Application Saved Data Management.”
  • Choose “Saved Data in System Storage.”
  • Select “Delete.”
  • Select “Fortnite.”
  • Choose “Delete.”
  • Select “OK.”

PS5:

  • Open PS5 “Settings.”
  • Select “Storage.”
  • Choose “Console Storage.”
  • Choose “Saved Data.”
  • Select “PS5 Games.”
  • Choose “Fortnite.”
  • Select “Delete.”
  • Select “OK.”

Xbox:

  • Press “Xbox.” (on the Xbox Wireless controller)
  • Choose “Fortnite.”
  • Press the three-line (Menu) button.
  • Select “Manage Game and Add-ons.”
  • Choose “Saved Data.”
  • Select the game data.
  • Press the “A” button.
  • Select“Delete from Console.”

After that, relaunch the game and verify this fix!

Update Fortnite

Another solution to resolve the problem on hand is to update the game to the latest version on your playing device. Doing so will install new patches for system bugs. Here’s how:

Computer:

  • Open “Microsoft Store.”
  • Click “Library.”
  • Choose “Get Updates.”
  • Select “Update All.”

Your PC will update all the outdated apps and games, including Fortnite.

Xbox:

  • Highlight Fortnite on your Xbox Home screen.
  • Press the three-line (menu) (pn the controller).
  • Select “Manage Game and Add-Ons.”
  • Choose “Updates.”
  • Choose “Update.”

PS4 and PS5:

  • Choose “Fortnite” on PS4 or PS5.
  • Press “Options.”
  • Select “Check for Update.”
  • Choose “Go to [Downloads]” to start the update process. 

After updating Fortnite, restart the game, and hopefully, the problem won’t recur.

Update Gaming Console

Outdated system software on your console often leads to compatibility issues with Fortnite and causes the game to crash while you join a party chat or keep kicking you out of the match.

To fix this, update your gaming console (PS4, PS5, or Xbox) to the latest version this way:

PS4:

  • Open PS4 “Settings.”
  • Select “System Software Update.”
  • Select “Next.” 
  • Choose “Update.”

PS5:

  • Open console “Settings.”
  • Select “System.”
  • Choose “System Software.”
  • Select “System Software Update and Settings.”
  • Choose “Update System Software.”
  • Select “Update.”
Updating PS5 software

Xbox:

  • Press “Xbox” (on the controller).
  • Choose “Profile & System.”
  • Choose “Settings.”
  • Select “System.”
  • Select “Updates.”
  • Choose “Console Update Available.”

Launch “Fortnite” on your gaming console now, and you should successfully join a party now.

Conclusion

In this article, we’ve explained why Fortnite experiences a crash when you are joining the party and how you can troubleshoot this issue with easy-to-follow solutions.

Hopefully, with these fixes, you can now connect with your friends during the Battle Royale in Fortnite without a hitch.

Fortnite Stuck On Loading Screen PS4 – Reasons + Fixes

0

If Fortnite is getting stuck on the loading screen on your PS4, its saved data might be corrupt, or the DNS address on your console is preventing the game from connecting to its server. To fix this problem, delete the game’s saved data in system storage, which is under the PS4 Settings menu. If this doesn’t work, change the DNS server to Google Public DNS on your gaming console. 

In this article, we’ll explore why Fortnite is getting stuck on the loading screen in your PS4 console and how you can resolve this annoying problem.

Why does my Fortnite get stuck on loading screen on PS4?

man with gaming controller

Below are some of the reasons why Fortnite gets stuck on the loading screen while playing it on your PS4:

  • Minor glitches in the game code.
  • Poor Wi-Fi speed.
  • Issues with the DNS settings on the console.
  • Corrupt Fortnite saved data.
  • High ping or latency in the selected Matchmaking region.
  • Server-side problem on Epic Games.
  • Outdated Fortnite game files or PS4 firmware.

How do I fix Fortnite stuck on loading screen?

man playing video games

If Fortnite gets stuck on the loading screen on your PS4 console, these 8 step-by-step solutions will help you sort this out issue.

Restart the Game

Restarting Fortnite on your PS4 is often the easiest solution to get the game past the loading screen and continue playing the Battle Royale.

To do this, simply press the “PlayStation” button on your console, press the “Options” button, and choose “Quit Game” or “Close Application.” Now, relaunch the game and see if the problem persists. 

Change the Matchmaking Region

The Matchmaking region settings in Fortnite connect you to the server region with the lowest ping or latency. However, if you are connected to a slow or far away server, it leads to the loading screen issues in Fortnite on your PS4. 

To fix this, change the matchmaking region within Fortnite settings by following these steps:

  • Open “Fortnite.”
  • Select the three lines in the top-right corner of the screen to open “Menu.”
  • Choose “Settings.”
  • Select the gear icon.
  • Select “Matchmaking Region” under “Language and Region.”
  • Choose a different region from your current one, preferably the nearest server.
Changing Matchmaking Region in Fortnite

Now, restart Fortnite on the console and confirm if this resolves your problem.

Check the Internet Connection

Poor Wi-Fi signals are often the culprit behind the stuck Fortnite loading screen on your PS4. This is because the app requires sufficient download and upload speed to connect the game to its server and load necessary resources. 

To address this, test your current internet speed. If the results are unsatisfactory, follow these instructions to get your connection up to par:

  • Move your PS4 closer to the router to reduce the distance and obstructions that may hinder the Wi-Fi signals.
  • Reboot your router to reset the lag in the network connection.
  • Use a wired connection to connect your PS4 to the router for better internet speed. 

Change the DNS Settings

Some users suggest that changing the DNS address to Google’s public DNS on their PS4 also helped them get the stuck Fortnite game out of the loading screen. Here’s how:

  • Open PS4 “Settings.” 
  • Choose “Network.”
  • Choose “Settings.”
  • Select “Set Up Internet Connection.”
  • Select your network.
  • Choose “Advanced Settings.”
  • Go to “DNS Settings”  > “Manual.”
  • Set “Primary DNS” to “8.8.8.8.”
  • Set “Secondary DNS” to “8.8.4.4.”
  • Select “Done.”

After changing the DNS settings on your PS4, open Fortnite and verify the fix.

Clear Fortnite Saved Data

Fortnite saves your progress, settings, and other in-game information on your PS4. But when this data gets corrupt or outdated, it causes the game to stay stuck on the loading screen or kick you out of the lobby.

To fix this, clear the Fortnite saved data on your console this way:

  • Open PS4 “Settings.”
  • Choose “Application Saved Data Management.”
  • Select “Saved Data in System Storage.”
  • Choose “Delete.”
  • Checkmark “Fortnite.”
  • Choose “Delete.”
  • Choose “OK.”
Deleting Fortnite Saved Data on PS4

Afterward, launch “Fortnite” on your PS4, and hopefully, you’ll get past the stuck loading screen this time.  

Update the Game

If you’ve not updated Fortnite for quite some time on your PS4, its files often become incompatible with the console, resulting in the loading screen issue.  

So, make sure to update Fortnite on your gaming console with the instructions given below:

  • Select “Fortnite” on PS4.
  • Press “Options” on the controller.
  • Choose “Check for Update.”
  • Choose “Go to [Downloads]” if an update is available to start the update process. 

After updating Fortnite to the latest version, confirm that the game loads correctly on your PS4.

IMPORTANT: If you’ve recently updated Fortnite on your PS4 and it stays stuck on the loading screen, simply wait for some time to let the game fully load all the new features and other content. 

Update PS4 Firmware

Epic Games regularly releases new updates for Fortnite to improve its performance and load time. 

These updates often require the latest PS4 system software version to work correctly. Otherwise, Fortnite may experience the loading screen issue or freezing issues.

To resolve this, update your PS4 to the latest version in the following way:

  • Make sure that your PS4 console is connected to a reliable and fast internet connection.
  • Open console “Settings.”
  • Choose “System Software Update.”
  • Choose “Next” if a new software version is available.
  • Select “Update.”

Check Fortnite Server

Fortnite sometimes experiences server-side problems due to scheduled maintenance or system overload. This causes the game to remain stuck on the loading screen on your PS4. 

To confirm if this is the reason, go to the Epic Games Public Status page and check for any ongoing maintenance or outages.

If the server is down, wait for the Fortnite developers to troubleshoot the problem at their end. In the meantime, you can reach out to the Epic Games Support team to report the issue for further guidance.

Conclusion

In this article, we’ve explained why Fortnite is getting stuck on the loading screen on your PS4 and how you can resolve this issue quickly.

Hopefully, with these fixes, you can get back to playing Fortnite on your gaming console without any glitches.

Fortnite Stuck On Loading Screen Xbox – Reasons + Fixes

0

Are you trying to play Fortnite, but it is stuck on the loading screen on your Xbox and won’t let you enter the lobby? This is a really frustrating issue and can leave you searching for solutions.

If Fortnite is getting stuck on the loading screen on your Xbox, the Alternate MAC address on your console might be misconfigured, or the game files are outdated. To fix this, go to Network Settings on your console and clear the Alternate MAC Address under “Advanced Settings.” You can also try updating Fortnite to the latest version on your Xbox to get past the stuck loading screen.

In this article, we’ll explore why Fortnite is getting stuck on the loading screen on your Xbox and how you can get rid of this problem in no time. 

Why won’t my Fortnite load on Xbox?

angry man holding game controller

If Fortnite is getting stuck on the loading screen on your Xbox and won’t let you compete in the Battle Royale, one of the following can be the reason for this issue:

  • Corrupt or outdated Fortnite local saved data or persistent storage on Xbox. 
  • Misconfigured Alternate MAC addresses or DNS settings.
  • Internet connectivity issues.
  • Outdated Fortnite game files.
  • Epic Games server outage. 

How do I fix Fortnite not loading on Xbox?

man playing video game

If Fortnite is stuck on the loading screen on your Xbox, here are 8 tried and tested methods for quick troubleshooting. 

Restart Fortnite

The first solution to fix the loading screen problem on Fortnite is to restart the game on your Xbox. This simple hack will refresh the game data and resolve any minor glitches that are causing the issue. To do this:

  • Press the “Xbox” button on the controller while you are in the game. 
  • Select “Home.” 
  • Choose “Fortnite.” 
  • Press the button showing three lines on it. 
  • Select “Quit.” 

Now, relaunch Fortnite on your Xbox and see if it is still getting stuck on the loading screen. 

If restarting Fornite doesn’t help, power cycle your Xbox console by unplugging it from the mains for 30 seconds and then connecting it back in. Afterward, open Fortnite and confirm if it loads this time around.

Clear Mac Address 

According to some Xbox users, clearing the MAC address on their console also helped them resolve the loading screen issue on Fortnite. Here’s how:

  • Press the “Xbox” button.
  • Go to “System.”
  • Choose “Settings.”
  • Choose “General.”
  • Select “Network Settings.”
  • Choose “Advanced Settings.”
  • Head to “Alternate MAC Address.”
  • Select “Clear.”

Afterward, relaunch Fortnite on your Xbox and check if this fixes your issue. 

Change DNS Settings

Incorrect DNS settings on your Xbox often cause Fortnite to experience issues while connecting to its online server, and, as a result, it gets stuck on the loading screen.

To resolve this problem, change the address to Google Public DNS by following the steps given below:

  • Press “Xbox.” 
  • Select “System.”
  • Select “Settings.”
  • Choose “General.”
  • Go to “Network Settings.”
  • Select “Advanced Settings.”
  • Select “DNS Settings.”
  • Switch to “Manual.”
  • Set Primary IPv4 DNS to “8.8.8.8.”
  • Set Secondary IPv4 DNS to “8.8.4.4.”

Now, press “B” on the controller, choose “Continue,” and then open Fortnite to see whether the problem still bothers you.

Clear Fortnite Local Saved Data

Like any other games and apps, Fortnite saves local data on your Xbox to keep track of your progress and other information. However, this data often gets corrupted or outdated, due to which the game is unable to retrieve the necessary files to load the lobby or battles screen. 

To fix this, clear the Fortnite local saved data on your Xbox with these steps:

  • Press “Xbox.” (on the controller)
  • Highlight “Fortnite.”
  • Press the three-line button.
  • Choose “Manage Game and Add-ons.”
clearing Fortnite game data on Xbox
  • Go to “Saved Data.”
  • Select the game data and press the “A” button.
  • Choose “Delete from Console.”

Once the saved data is deleted, restart your Xbox, open Fortnite, and verify the fix. 

Clear Persistent Storage Data

Your Xbox also stores persistent or cache data related to Blu-ray disc playback and other information to improve game load time and performance. However, this data, too, gets outdated over time and causes Fortnite to stay stuck on the loading screen.

The best solution here is to clear the persistent storage data on your Xbox this way:

  • Press “Xbox.”
  • Go to “System” > “Settings.”
  • Choose “Devices & Connection”
  • Choose “Blu-ray.”
  • Select “Persistent Storage.”
  • Choose “Clear Persistent Storage” three times.
Clearing persistent storage on Xbox

After clearing the persistent storage data, restart your console, and that’s about it!

Troubleshoot Internet Connection 

With a slow internet connection that experiences frequent data packet loss, Fortnite finds it hard to fetch games on your Xbox, leading to the loading screen or freezing issues.

Therefore, make sure your internet connection is stable and reliable with these instructions:

  • Unplug the router from the mains for 30 seconds and plug it back in to improve network performance. 
  • Disconnect any internet-hogging device from your router to reduce network congestion.
  • Move your Xbox closer to the router (for better Wi-Fi signal strength). 
  • Change the Wi-Fi bandwidth from 2.4 GHz to 5 GHz for better internet speed. 
  • Consider switching to a wired connection if possible to get a more stable speed for your network connection.

Update Fortnite

Another solution to get Fortnite out of the stuck loading screen on your Xbox is to update the game to the latest version. To do this:

  • Highlight Fortnite on the Xbox home screen.
  • Press the three-line button (menu) on your Xbox controller.
  • Choose “Manage Game and Add-Ons.”
  • Select “Updates.”
  • Select “Update.”

Once the update process is complete, open “Fortnite” on your Xbox, and hopefully, it will successfully load this time.

Reset Xbox

Have you tried everything, but the problem still persists? Soft reset your console to remove any corrupt data files or minor glitches that are resulting in this annoying issue.  For this:

  • Go to “System.”
  • Choose “Settings.”
  • Select “System.”
  • Select “Console Info.”
  • Head to “Reset Console.”
  • Choose “Reset and Keep My Games and Apps.”

Next, set up your Xbox again, open Fortnite, and that will be it! 

Conclusion

In this guide, we’ve explained why Fortnite is getting stuck on the loading screen on your Xbox and what steps you can take to troubleshoot the problem as soon as possible. 

We hope that with this guide, you continue to have fun playing Fortnite on your Xbox without any hindrances. You can also check the Epic Game Public Status page for any ongoing maintenance or outages. 

In case the server is down, wait for the developers to get everything back up and running again.

MW2 Mic Not Working PS5 – Reasons & Fixes

0

MW2 (Modern Warfare 2) has quickly gained popularity since its release in 2022, but many users report that while playing the game, the mic is not working on their PS5, and they cannot voice chat with other players.

If you are playing MW2 and the mic is not working on your PS5, the audio settings on your console might be interfering with the game settings, or the MW2 saved data is corrupt. To fix this, press “PS5” on the controller, choose “Audio/Sound,” and turn off “Disable Voice Chat.” If this doesn’t help, delete the “MW2” saved data through “Console Storage” on your console.

In this article, we’ll discuss why the mic is not working while playing MW2 on your PS5 and in what ways you can fix this problem as soon as possible. 

Why is my mic not working in MW2 game chat PS5?

man gaming

If you are in the MW2 gameplay and the mic is not working and robbing you from chatting with other players, this can happen due to: 

  • Faulty microphone connection.
  • Incorrect input and output device settings on the console.
  • Incorrect audio settings on PS5 on MW2.
  • Outdated or corrupt saved game data.
  • Issue with the Activision account.

How do I fix the MW2 mic not working on PS5?

man playing ps5

If you are playing MW2 and the mic is not working on your PS5, these 6 step-by-step solutions will help you get back to chatting with other players.

Check the Audio Settings

The audio settings on your PS5 often override the in-game settings of MW2 and prevent the mic from working.

To fix this:

  • Press the “PS” button on the controller supplied with your PlayStation 5.
  • Choose “Audio” or “Sound.”
  • Turn off  “Disable Voice Chat.”

Now, open MW2 and see if you can communicate with other players. If not, do these settings on your PS5 home screen:

  • Press “Home” on the PS5 controller to open the mini menu.
  • Select “Game Base.”
  • Press the “Options” menu.
  • Choose “Game Base.”
  • Choose “Settings.”
  • Disable “Voice Chat.” 

Still the same issue? Configure the microphone settings within the game by following these steps:

  • Open a game (for example, Modern Warfare II) on your PS5.
  • Press “Option.”
  • Go to “Settings.”
  • Select “Audio.”
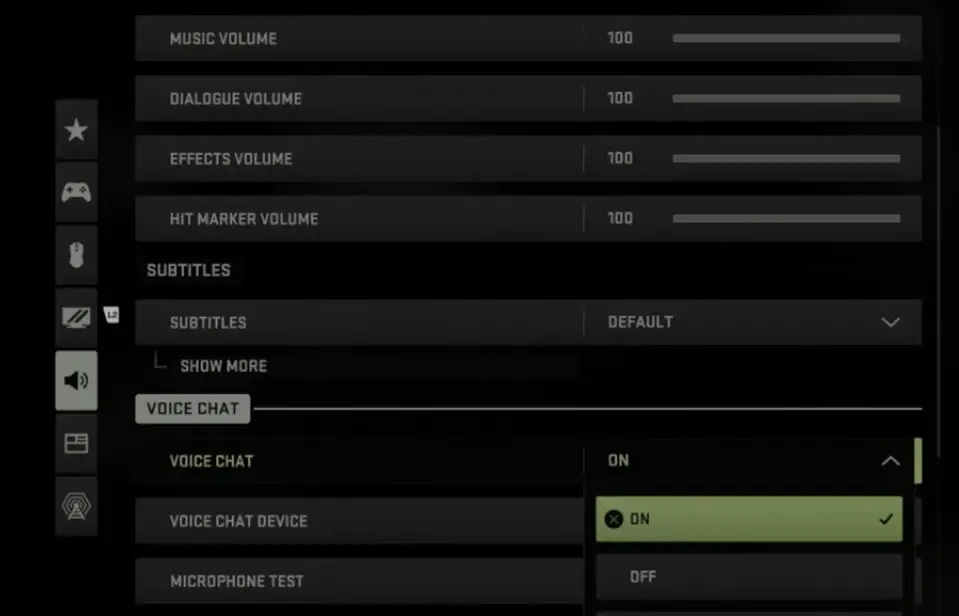
  • Choose “Voice Chat.”
  • Set “Voice Chat” to “ON.”
volume controls ps5
  • Set “Microphone Level” to “100.”
  • Set “Open Mic Recording Threshold” to “65 – 70.”
  • Toggle off “Mute Yourself When Connecting.”

Afterward, go to the “Invite Section,” choose “Game Voice Channel,” press the “Triangle” button on the controller, and select “All Lobby.” 

Next up, open the “Options” menu in the game, go to “Account & Network,” and ensure the “Crossplay Communication” is set to “ON.” Now, go to the “Audio” section again and turn on “Microphone Test.” The mic should start working in the MW2 game on your PS5!

IMPORTANT: You may have muted the mic within the MW2 game on PS5, causing it to stop working. To verify this, check the “Mic” icon next to your game channel, and if you see a line going through it, press the “RT” button to unmute yourself.

Inspect the Microphone Connection

It is possible that the issue lies with the physical connection of your mic to the PS5, due to which you cannot chat with others in the MW2 channel. 

So, inspect the microphone cable for any damage and make sure it is securely connected to the console. You can also test the mic on another device to verify if it is the underlying cause of this annoying issue.

NOTE: If the cable or microphone is damaged, consider replacing it with a new one. 

Configure the Input and Output Source

Another reason can be the wrong input and output source on your PS5, causing the mic to stop working in the MW2 game.

But don’t worry! Just follow these step-by-step instructions to resolve this problem:

  • Open “MW2.”
  • Press “PlayStation” on the controller to access “Control Center.”
  • Choose the “Sound” icon.
  • Select the right Output Source.
  • Configure “Volume” to “100.”
  • Choose “Mic.”
  • Select the correct input source.
  • Select “Adjust Mic Level” and configure it as per your preferences.

Once you do that, your PS5 will correctly detect the headset mic, and it should start working during the gameplay.

Clear MW2 Saved Data

According to some PS5 users, clearing the MW2 saved data on their console also helped them get the mic working again. Here’s how:

  • Go to the PS5 “Home” screen.
  • Select “Settings.”
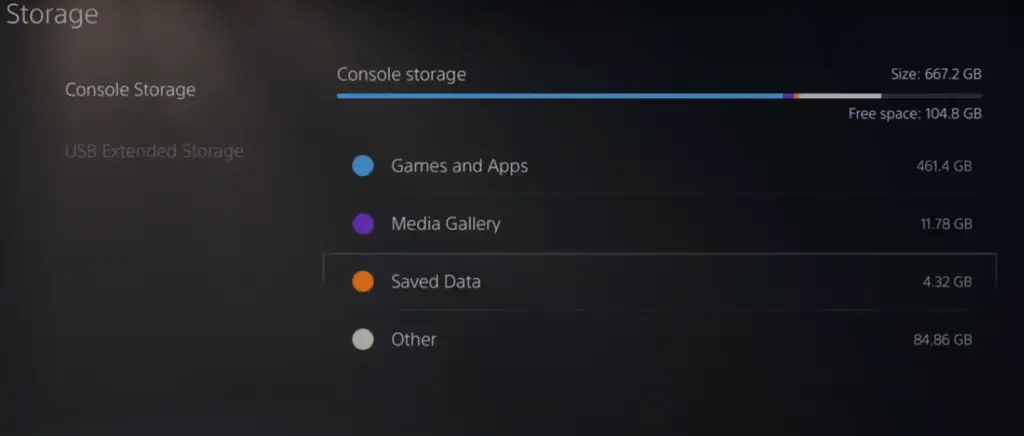
  • Choose “Storage.”
  • Select “Console Storage.”
  • Choose “Saved Data.”
console storage
  • Select “PS5 Games.”
  • Choose “Delete.”
  • Checkmark “Modern Warfare II (MW2).”
  • Choose “Delete.”
  • Choose “OK.”

After this, restart the MW2 game on your PS5 and verify the fix.

NOTE: Deleting the MW2 saved data on your console won’t delete the game progress and weapons. It will only erase the campaign data.

Create a New Activision Account 

If someone reports your account to Activision or you violate some guidelines, the developers can shadow-ban your account. For this reason, the mic may stop working for voice chat during the MW2 gameplay on PS5. 

The best workaround here is to create a new Activision account on your console and confirm if the mic is working during the game now.

Reinstall MW2

Tried everything, but the mic is still not working during the MW2 game on your PS5? Uninstall the MW2 game on your console and reinstall it to resolve any minor system glitches in the game. To do this:

Through Home Screen:

  • Press “Home” on the controller.
  • Select “MW2.”
  • Press “Options” on the PS5 controller.
  • Choose “Delete.”

Through PS5 Library:

  • Access “Game Library” from the Home screen on your PlayStation.
  • Go to “Installed.”
  • Find “MW2.”
  • Press “Options.” (on the controller)
  • Choose “Delete.”

After deleting MW2 from your PS5, do the following steps to reinstall it:

  • Open “PlayStation Store.”
  • Search for “Modern Warfare II.”
  • Choose the three dots.
  • Select “Version.”
  • Select the “PS5” version.
  • Choose “Download.”

Open the Modern Warfare II on your PS5 once the installation is complete, and hopefully, the mic will start working this time.

Conclusion

In this article, we’ve explored the reasons and told you what to do if you are playing the MW2 game and the mic is not working on your PS5 console. 

Hopefully, your issue is resolved, and you can now quickly start a voice chat with fellow MW2 gameplayers.

However, if the issue still bothers you despite all your efforts, contact the PS5 support team via call at 1-800-345-7669 to get more personalized guidance to fix the mic.

Sky Q Remote Flashes Twice but Doesn’t Work? Fix the Issue

0

Is your Sky Q remote flashing twice but failing to function as expected? This article provides practical solutions and troubleshooting tips to get your remote back in working order.

Sky Q Remote Flashes Twice But Won’t Work

Pointing remote at television

If your Sky Q remote is flashing but won’t control your Sky Q box, try restarting your Sky Q box.

Start by pressing the standby button on the front panel of your Sky Q box. Next, switch off your Sky Q box at the mains.

Check all cable wires are securely connected to the box and if they are, switch your Sky Q box back on again.

Instructions will appear on your TV screen when the box switches back on. Once they have been completed, press the home button on your remote.

If this doesn’t fix the issue, it could be that the connection between your Sky Q box and remote has been lost.

How to Re-Pair Your Sky Remote and Sky Q Box

If your Sky Q remote control is still flashing but is not controlling your Sky Q box, try re-pairing your remote control.

You can do this by holding down numbers 1 and 3 on your remote. Instructions should then appear on the screen for you to follow. This will take you through the re-pairing process.

Loss of connection between the Sky Q box and remote control is often the cause of remote-control issues with Sky Q. In which case, this should solve your problem if your remote flashes but doesn’t work.

If this step doesn’t work, you might have an issue with the remote control itself. Let’s take a look at how to fix it.

How to Rule Out a Faulty Remote Control

If you have tried the steps above and your Sky Q remote still flashes but doesn’t work, you should first check the batteries in your remote.

To rule out low batteries causing an issue with your Sky Q remote control, replace the current batteries with new ones. Once in, press the ‘?’ button on your remote.

If the LED light flashes again, you will need to re-pair your remote using the steps above. If the remote control is still unresponsive, you might have a faulty remote control.

You can contact the Sky Q Support team directly if you believe your remote control is faulty, who will go through further troubleshooting.

Sky Remote Volume Works But Nothing Else

If you can use your Sky Q remote to change the volume but nothing else, it might be an issue with the box itself, not the remote.

Reset your Sky Q box by switching it to standby, and then turning it off at the mains, wait for three minutes and then turn your Sky Q box back on again.

Once the instructions have played out on the screen, press the home button on your remote control. You will then want to go through the remote re-pairing process by holding down numbers 1 and 3.

How to Avoid Issues With Sky Q Remote

The majority of problems people encounter with their Sky Q remote is fixed by re-pairing the remote control and the Sky Q box. This feature was brought in to ensure that users had a better experience when using Sky TV.

You can also re-pair your remote control if you notice it becomes unresponsive in the future. Additionally, if you notice a lag when using the remote, try a re-pair.

You can also avoid further issues with your Sky Q remote by ensuring that your batteries are changed as and when required. Additionally, check your buttons aren’t stuck down in the remote, as this can cause the remote to be unresponsive.

Samsung TV Making Beeping Noise: Why It Happens & How To Fix

0

Samsung televisions are renowned for their outstanding image clarity and advanced functionalities. Nevertheless, similar to any electronic device, they can encounter intermittent problems.

Among the frequent issues faced by Samsung TV owners is the occurrence of a beeping noise emanating from their devices.

So, if your Samsung TV is making beeping noises that are stressing you out, then keep reading as we guide you on how to fix it.

Old man watching television
Envato Elements Pressmaster

Why is my Samsung TV making beeping noises?

Remote control interference: One of the most common causes of a beeping noise from a Samsung TV is interference from other remote controls. If you have multiple devices with remotes (such as a cable or satellite box, DVD player, or game console) near your TV, they may be emitting signals that interfere with your Samsung TV’s remote control receiver, causing the beeping sound.

Low battery: Another simple explanation for the beeping noise could be low battery power in your TV remote control. When the battery power is low, the remote emits a beeping sound to indicate that it needs to be replaced.

External device notifications: Some Samsung TVs are designed to provide notifications when external devices are connected or disconnected. These notifications can manifest as beeping sounds. For example, if you plug in a USB drive or connect a new HDMI device, the TV might emit a short beep to indicate the change.

Input signal issues: A poor or inconsistent input signal can also lead to beeping noises on your Samsung TV. This can occur when you have faulty cables or loose connections between the TV and external devices. The TV might emit beeping sounds as it tries to establish a stable connection with the input source.

Television remote
Photo by Envato Elements

How to stop a Samsung TV making beeping noises

To stop the sound feedback of your Samsung TV, due to malfunctioning, try the following instructions.

Go to the settings of your Samsung TV, then locate and open the sound settings. Here look for the option labelled as “Expert Settings” and select it. In that menu, you should be able to find the option for “Sound Feedback”, turn it off.

If turning the sound feedback does not fix the beeping, then you can attempt the following solutions:

Identify the source of interference: Take note of any nearby devices that could be interfering with your TV’s remote control receiver. Move them away from the TV or turn them off.

Change the remote control frequency: Some Samsung TVs allow you to change the remote control frequency to avoid interference. Consult your TV’s user manual to find out how to change the frequency settings.

Replace the batteries: Open the battery compartment on your Samsung TV remote control and replace the batteries with new ones. Ensure that you are using high-quality batteries to avoid future issues.
External device notifications:

Adjust settings: If the beeping sound is caused by notifications when devices are connected or disconnected, you can adjust the settings on your Samsung TV to disable these notifications. Refer to your TV’s user manual for guidance on how to access and modify these settings.
Input signal issues:

Check cable connections: Inspect the cables connecting your external devices to the TV. Ensure that they are securely plugged in and not damaged. Consider replacing any faulty cables.
Reset the TV: Sometimes, resetting your Samsung TV to its factory default settings can resolve input signal issues. Refer to the user manual to learn how to perform a factory reset on your specific TV model.

How to stop Samsung TV making sound at startup and turn off

All Samsung TVs make a sound when you turn them on and off. If you do not want the TV to do this, then please follow the instructions below.

Press the ‘Menu’ button on the Samsung TV remote, then go to ‘Setup’. Here look for the ‘Melody’ option and turn it ‘Off’.

Now, your Samsung TV won’t make noises at startup or turn off.

Conclusion:

Experiencing a beeping noise from your Samsung TV can be frustrating, but it is usually a solvable problem. By identifying the possible causes and following the suggested solutions, you can resolve the issue and enjoy uninterrupted viewing on your Samsung TV. Remember to consult your TV’s user manual for specific instructions related to your model. In case the problem persists, contacting Samsung’s customer support or seeking professional assistance might be the best course of action.

LG TV Stuck In Demo Mode But No Remote? Get Your Screen Back

0

A frequent problem faced by LG TV users is getting trapped in demo mode without access to a remote. This situation hampers your ability to fully utilize the TV’s features and restricts your access to desired settings, depriving you of an optimal viewing experience.

If your LG TV is stuck in ‘demo’ or ‘store’ mode and you can’t find or don’t seem to have a remote control, then you may feel pretty stumped. But, there’s no need to worry as we go through, step-by-step, how to get this issue resolved.

In this article, we will show you what to do when your LG TV is stuck in demo mode, even in cases where a remote is not readily available. Let us delve into the topic and examine how to remove your LG TV from demo mode and restore it to its regular functioning state.

Man watching television
@tcboncore via Twenty20

LG TV stuck in demo mode but no remote

There’s nothing worse than attempting to use your TV to find that it’s stuck in demo mode. By following the steps below, you should find yourself faced with a fully functioning telly – even if you don’t have a remote control.

First and foremost, always attempt a ‘hard reset’ of your TV. This means turning the TV off, waiting around five minutes, then turning everything back on.

If you’re still stuck in demo mode on turning your TV back on. Then please run through the following steps:

  • Locate the ‘Home’ or ‘Menu’ button on the back or side of your television.
  • Long-press this button on the TV for around 20 seconds.
  • Now, a message should appear reading: “Demo mode: Off”.

If you’re struggling to turn off demo mode without a remote control, you can always purchase a universal remote control online from stores such as Amazon for around £20.

LG smart tv stuck in-store demo mode

If you do have a remote control, then that makes things a little easier. Please follow the steps below to get out of store mode using the remote.

  • Using the remote control, press the ‘Home’ button.
  • Click ‘option’ > ‘mode setting’ > ‘home use’.

For anyone with a WebOS LG TV, please use the following steps:

  • ‘Settings’ > ‘more settings’ > ‘general’ > scroll down to ‘home/store mode’ and select ‘home mode’.

My LG TV keeps reverting to store mode

If you managed to get out of ‘store’ or ‘demo’ mode but your TV keeps reverting back, please follow the next steps to correct the issue.

Firstly, try hard resetting the whole home entertainment system.

  • Unplug the TV and any other devices connected to the TV from the mains.
  • Unplug any extra devices such as a games console or Digi Box from the TV.
  • Wait around five minutes before plugging just the TV in again.
  • Now, once you turn on the TV it should have reset.

Try the above steps including holding down the ‘exit’ button on your remote control and selecting ‘home use’.