If you’re sick and tired of experiencing an intermittent black screen on your Sony TV then worry no more as we run through a variety of troubleshooting steps to get your TV working as it should.
Sony is among some of the most popular TV brands out there with the company being established for over 70 years now.
And while TVs in the 21st century seem to supersede anything that came before them, any device, big or small, expensive or budget can experience issues from time to time.
There’s nothing more disappointing than when your tech breaks down on you, so let’s take a look at what to do if your Sony TV screen goes black randomly.
Photo by Envato Elements
Sony TV: Why do I have an intermittent black screen?
There are a few reasons as to why you’re experiencing an intermittent black screen on your Sony TV.
First and foremost, the issue can arise depending on the optimisation settings of your television screen. We take a look at this in more depth below.
An intermittent black screen could also be due to something as simple as a loose cable or connection. Be sure to check that all your devices are connected correctly with cables secure and in good condition.
How to fix an intermittent black screen on your television
The first solution we are going to run through is in relation to the TV screen optimisation settings.
Using your Sony remote control, navigate to ‘settings’. From here, follow these steps:
Display > video input settings > digital broadcast picture mode > choose ‘optimise for text and graphics’.
How do I fix my TV when the screen goes black?
If you’re still having issues with your Sony TV and the screen going black at random intervals, there may be some other solutions to try.
Ensure that your Sony TV is running on the latest software. Please see Sony’s guide on how to perform a system update on your television.
Unplug and reconnect the TV power cord to ensure that it is securely in place.
Try unplugging all exterior devices from your Sony television. Turn on the TV and try loading an app such as Netflix. If your TV is now working fine, the error could be related to hardware plugged into the TV.
Is your TV stuck in demo mode? See our guide on how to get out of ‘store’ or ‘demo’ mode here.
Is your remote control faulty? If you’re trying to turn your TV on with the remote control but you’re seeing a black screen, try turning on the television via the power button rather than the remote.
Check that your TV isn’t set to power saving mode or sleep mode. If you often see your TV turn off automatically, then it could be set to eco-mode. To change this, Sony outline some steps here.
As a last resort, you can factory reset the television which almost always gets things working correctly.
To see a manual for your specific model of Sony TV, please follow this link.
Having an LG TV and a Tata Sky subscription, yet not being able to program the service on your TV can be a frustrating situation.
You could be prevented from watching your preferred channels and shows and might be uncertain about the solution to fix it.
However, there are some quick solutions you can use to get your LG TV working with Tata Sky. In this article, we will offer you some useful recommendations to resolve the LG TV not programmed with Tata Sky issue and help you get back to enjoying your entertainment quickly.
Why is my LG TV not programmed with Tata Sky?
So, according to LG’s website, the main reason that your LG TV is showing a ‘not programmed’ error is due to the TV input not being set up correctly.
The first thing we would suggest is to check that all of your input and output cables are connected securely, this will be your HDMI cables, Scart and more.
Now, navigate to your LG TV settings with the remote control and go through the AV, Digital TV and HDMI setup.
Credit: NomadSoul1
LG TV not programmed – solutions
The quickest and easiest way to fix the ‘not programmed’ issue is to click the Smart button on your LG remote and select ‘Input list’, then select AV until your TV picture shows up.
Alternatively, you can go to ‘settings’, then ‘input’, now select HDMI 1 or HDMI 2 or AV1 or AV2 and your TV picture should now show.
Finally, if this still hasn’t fixed the issue it probably means that there’s another issue going on with the TV, for example with the channels. We’d advise that you complete an auto programme on the TV if this is the case.
Credit: diego_cervo
Conclusion
To sum up, if your LG TV is not set up with Tata Sky, you can take some actions to resolve the problem. Begin by verifying that your TV is compatible with Tata Sky and you have an active subscription. Next, attempt to reset your TV and Tata Sky set-top box, and conduct a channel rescan. If these measures fail, it may be necessary to seek further assistance from Tata Sky customer service or an LG professional.
By following these troubleshooting steps, you should be able to get your LG TV functioning with Tata Sky effectively.
If the issue still persists then contact us today for instant support.
Sky TV users can encounter a number of error codes, such as 35abcd, and it’s often hard to find answers on how to correct them.
There are a number of forums that can help but it takes way too much time to find a solution to your exact problem.
That’s why we’ve gone to the trouble of finding the answer to your issue ourselves and condensed it into one short guide.
Our experts have years of experience dealing with pesky Sky TV errors and know the ins and outs of the service.
Read below to find out what this error is and how to solve it quickly.
What is Sky TV error code 35abcd?
Error codes popping up on Sky TV can be any number of things, from needing an update to problems with your cables.
The Sky TV error code 35abcd relates to issues with your Sky box and the frequency it is using.
If there is a difference between the frequencies your Sky box is using to the frequencies the channels are being provided in, you won’t be able to receive your usual channels.
But, there’s no need to worry this is easily fixable with the help of this guide from Your Fix Guide.
How to fix this common Sky error code
Press and hold the standby button on your remote, this will put it into standby, wait five minutes before turning it back on and see if this resolves the issue.
It could be a problem with your dish input, be sure to turn off your box at the mains before checking all cables are plugged in securely and have no damage.
Make sure your signal strength is good by switching your Sky box to standby and disconnecting, then reconnecting the satellite cables to Dish Input 1 and 2.
It could be that the dish itself has been knocked out of alignment and needs to be moved into the correct position.
Your Sky box can sometimes be stuck in Standby mode and it usually just takes turning it off at the mains to reset.
Some channels will occasionally pop up with mysterious error codes but more often than not if you switch channels and go back to it, the error should sort itself out.
An extremely common error is the Sky box not receiving any signal, this could be due to bad weather or many other factors including loose cables.
If you are looking for a decent webcam to start streaming, the Razer Kiyo Webcam is highly recommended. The Razer is highly recommended due to its specs which include flattering imagery and faster resolution. Although the Razer webcam can seem expensive upfront, it is a great gadget.
It is reported that users of the Razer webcam are experiencing issues with a blurry webcam and it not being high quality. However, this should not be the case. Therefore we have compiled a guide on how to fix a blurry Razer webcam and other Razer issues. So how do you fix a blurry Razer webcam?
Photo of Razer Kiyo
Blurry Razer Webcam – Why does this happen?
Webcams are known for being poor quality and producing a lot of noise. However, with the Razer Kiyo, these issues shouldn’t occur. Due to the high specs of the camera and light, blurry footage shouldn’t be an issue. But when your Razer webcam appears blurry, this can seem concerning due to the high specs of the camera.
As the webcam has built-in autofocus, however, this does mean that it is likely to deal with blurry webcam issues, such as focusing on the wrong thing, or even worse, not finding anything to focus on. For a webcam of this price, users have advised that it should have better autofocus.
But if you are using the camera for videos, you should find the autofocus useful once you have the autofocus perfected.
If you’re unsure about the webcam autofocus, do not worry, you can resolve the issue with ease. So how do you turn off the autofocus and make it a manual focus camera instead?
Can I turn off autofocus on the Razer webcam?
Yes, you can turn off autofocus on a Razer webcam, however, you need to download software.
To turn off the autofocus on a Razer webcam, you need to use Razer’s Synapse Software. The software provides you with the settings for your camera, including white balance, manual focus, and exposure settings. However, the Synapse software doesn’t capture footage, so third party software is required for this.
How do I turn autofocus off on a Windows PC?
If you’re looking to turn off the autofocus on Razer Kiyo to fix the blurry webcam issue, here are the steps to do so:
When you connect your webcam for the first time, Windows will offer to download Synapse for you. Go ahead and download the software.
Once the software is downloaded, you can sign up or use it as a guest.
In Synapse, find the Kiyo Razer, then advanced settings
Disable autofocus by unticking the auto checkbox
Then set the focus by hand. A value of around 190 provides a great focus.
Apply the settings, and they will be stored within the webcam, so if you want to turn autofocus back on later, all you need to do is retick the box.
Photo by Waldemar Brandt on Unsplash
Razer webcam with ring light
The Razer webcam has a built-in ring light, one of the key features above other webcams, as it provides clear video in low-resolution settings with colour accuracy.
Razer are known for their standalone ring lights and have been used for years by YouTubers and streamers. But introducing their own webcam with a ring light has provided even more opportunity, as it has its own compact ring light attached. Creating high-quality video footage has never been easier. Unlike the autofocus, you can adjust the ring light on the webcam by twisting it. This is ideal for ease between using it at night and during the day.
Are you having issues with your Logitech webcam? Here’s how to fix your blurry webcam!
Razer Kiyo Webcam specs
The webcam offers an impressive colour spectrum, even in dim light and captures high-quality imagery. It can record video in 1080p resolution at 30 frames per second (useful for streamers/YouTubers), or it can provide 60 frames per second in 720p. The higher the frame rate, the smoother the footage will be. With such great video quality, you’ll never go back to your standard webcam.
Despite the high-quality camera footage, users were expecting equal quality for the microphone. However, the built-in microphone hasn’t lived up to the camera’s standard. With users of the webcam advising that their sound wasn’t clear, and it was super quiet compared to other microphones.
What software should I use for streaming on Razer webcam
If you’re looking for a programme to allow you to stream via your Razer webcam, Razer recommends using OBS or Xsplit. Both of these allow you to record footage for streaming. You can also use any web conferencing software such as Zoom and Microsoft teams for video calls.
Whether you’re considering a Razer webcam for streaming, video conferences, or filming, the camera has some great features that others don’t, such as the ring light.
Wondering how to get Disney Plus on older Phillips smart TV? Getting a Phillips Smart TV is exciting, but if you have an older version and want to watch Disney Plus on it, you may find it difficult to do so. Though this can ruin your plans for the evening, there are a few ways to fix this easily.
Phillips Smart TV works like an Android phone, so you don’t have to worry too much about the complexity. We have all the information you need to set up all types of Phillip Smart televisions in an instant.
Even though Disney Plus is one of the foremost streaming platforms of our time, it can run into a few issues from time to time. Follow this step-by-step guide for everything you need to know on how to get Disney Plus on older Phillips smart TV.
Can I Add Apps to an Older Philips Smart TV?
Philips smart TV offers an entertaining experience for all ages. If you want to install more apps, follow the given steps:
Go to the home screen.
Click on Apps.
Find the “Store” option in the apps section.
Type the name of the app in the search bar.
Click on the app.
Click on the install icon.
After it’s installed, click “OK.”
Open the app and enjoy watching new content.
How Do I Install Disney Plus on My Old Philips Smart TV?
Once you have installed a streaming device on your old Philips Smart TV the answer to “how to get Disney Plus on older Phillips Smart TV?” becomes easier. Just follow the given steps and you can enjoy all the latest shows on Disney Plus:
After putting on the TV’s home screen just sift through the apps on your TV. Once you reach the “Add Channel” option, click on it and it will list out all the channel options for you.
Keep looking for the Disney Plus option from the list of channels. When you find the Disney Plus option click on it.
To get Disney Plus on the second screen, you can browse through the home screen and click on the Disney Plus icon.
When you have returned to the home screen, you can either log in if you already have an account or sign up for a new account.
In case you don’t have an account in the Disney Plus channel, you can use your Gmail account to make it more personalized. Just make sure that your Gmail account is not connected to multiple devices. If you use a single Gmail account for signing in, you might get a security alert.
Add a new Gmail account or any other account you use to make your Disney Plus experience more palatable.
Preparing Your Older Philips Smart TV
Older Philips smart TVs can be modified to support Disney Plus. We have outlined a few steps to check the details of your older Philips smart TV and the changes you need to make to make it compatible with the Disney Plus app. Here is how you can prepare your older Philips smart TV to enjoy your favorite Disney shows:
Check the Version Of Phillip Smart TV
Instead of jumping right into the settings to see how to get Disney Plus on older Phillips smart TV, you need to check whether your Philips model can support it. If you have Roku TV
4700 series, it will come with a pre-installed Disney app. If you have an old version of a Philips TV it might not support the Disney Plus app.
After identifying the model of your Philip device, you can follow the instructions given below.
Get A Streaming Service
A streaming device can overrule the operating system of your smart TV allowing you access to all the latest streaming services. If you are still confused about how to get Disney Plus on older Phillips smart TV, you need to understand that a streaming service is an intermediary between two devices. Check out two streaming platforms that can help you get Disney Plus on your old Philips smart TV.
Roku
Roku is a streaming device that will resolve the question of how to get Disney Plus on older Phillips smart TV. You can download a Disney Plus app on the Roku stick. When you have connected your Roku stick with an HDMI cable, search for the “add channels” option and select Disney Plus.
Fire Stick
Another option is the Fire Stick which can be attached to the HDMI USB port in your Philip smart TV. All old and new Philip TV models carry two HDMI portals.
Once you find the HDMI portal, connect the Fire Stick with the television. Connect the Firestick with your regular WIFI connection and set up your device.
Check The HDMI Portal
An HDMI (High-Definition Multimedia Interface) portal is an outlet that connects your device with a streaming service through a cable and an internet connection. If you haven’t heard of an HDMI port, don’t worry. It’s a small USB-like portal that has three types, including standard HMI (Type A), mini HDMI (Type C), and Micro HDMI Type C. Once you identify the type of HDMI portal installed in your Phillips smart TV, you can buy an HDMI cable.
Get An HDMI Wire
The HDMI cable that you buy from the store must match the HDMI portal on your phone. After identifying the type A, C, or D, just ask your local store to provide you with the one you need. Insert the cable in the portal and attach the other end with the streaming device you have just bought. When the streaming device is connected, you can start it and download the Disney Plus app.
Download Disney Plus App
As soon as you connect both the streaming device and the HDMI cable, it is now time to open your home screen. Just go through the apps on your home screen until you find the “Add Channel” app and select the Disney Plus app in the list.
Sign In Or Sign Up
This is the last solution on how to get Disney Plus on older Phillips smart TV. Once you download the Disney Plus app, click on the icon. Pick one option from either “Sign In” Or “Sign Up”. In case you have an account, just put your username or email address in the slot and write your password. If you don’t remember your password, you can use your phone or Google to sign in. If you are new to the Disney Plus franchise, sign up with a new account by adding the relevant information.
Conclusion
We hope you found this guide on how to get Disney Plus on older Phillips smart TV helpful. While the issue is a pesky one, it is quite simple to resolve. We suggest you start with the most basic set: resetting your smart TV. If you find that none of the solutions above haven’t helped and the issue is still present, consider getting in touch with Philips’ customer service.
Samsung TV entertains the whole family. So when it starts making a buzzing noise, there must be something wrong with the internal working. The reasons why your Samsung TV makes a buzzing noise can vary from overheating to problems in your circuit. A careful analysis of all the parts of your Samsung TV will help you reach the root of the problem.
Samsung TV is perfect to enjoy your latest shows on a flat screen. The TV can easily blend into your decor with a painting or a picture display. It gives your home a sleek look and allows you to sit back and relax as you enjoy your favorite shows. However, the only sound that a Samsung TV should produce is the show you are watching.
If you constantly hear buzzing noises from your Samsung TV, it might be the beginning of a problem. If the annoying noise is interfering with your viewing experience and giving your anxiety, don’t worry. We have compiled a list of possible solutions that can help stop these noises
Why Is Your Samsung TV Making Buzzing Noise?
Samsung TV makes buzzing noise because of various technical and mechanical problems. When a Samsung TV is used for a long time, it can overheat and Samsung TV makes a buzzing noise. The overheating is just a sign and is indicative of the placement and use of your Samsung TV. Catching the problem behind the buzzing noise early on can save you from a lot of hassle. Here are a few problems that might be causing a nuisance in your Samsung TV.
Lack Of Ventilation Causes The Fans To Overclock
When a Samsung TV is cramped into a small space, it doesn’t get proper ventilation. The lack of ventilation leads to the expansion of the plastic in Samsung TVs. When the plastic expands beyond its limit, Samsung TV makes a buzzing noise. Here are a few ways you can fix this problem:
Place the Samsung TV in a place where it gets proper ventilation. Move any bookshelves away from the TV or fix them on a wall with no other furniture attachment placed near it.
Change the air conditioning levels in your room to keep it cool.
Keep the windows open to let the air inside. The air circulation in the room will help you create a better environment in your home.
Surface Problems Lead To Poor Heat Dissipation
When a Samsung TV is placed on an unlevelled surface, Samsung TV makes a buzzing noise. Make sure the Samsung TV is placed on a flat surface so it doesn’t wobble or tilt. A slight tilt can ruin the functioning of the TV causing glitches in the visual or audio display. Here are a few precautionary measures that can resolve the issue:
Place the Samsung TV on a wooden table and keep it at least five inches away from the wall.
You can get “My Shelf” from the Samsung outlet that has upper and lower casings. This shelf melds seamlessly into your decor. It is available in 55-inches, 65-inches and 75-inches.
A Samsung frame keeps it perfectly aligned as your TV will fit snugly into the frame. The frame comes with a wall-mount and keeps the Samsung TV perfectly aligned.
Get a sleek shelf to ensure that your Samsung TV doesn’t tilt. It is a more affordable option than buying a frame or “My Shelf”.
Once the Samsung TV is placed on a flat surface check to see if the buzzing noise has stopped. The buzzing noise should stop as soon as the Samsung TV is placed on a flat surface. If it doesn’t, then use then try the next step.
Incorrect Mounting Is A Menace
Mounting a Samsung TV makes your space look sharp and orderly. A proper mounting should leave a proper gap between the wall and the back of the TV. If there is a small space between the TV and wall, then the air circulation is limited and Samsung TV starts to overheat.
A professional should carry out the mounting process. However, if you have mounted the Samsung TV on your own, check the screws of the mount. Tightening the screws more than their usual requirement can cause ventilation problems and Samsung making buzzing noises. Follow the given steps to resolve this issue:
Check all the screws one by one.
Move your hand across the back of the Samsung TV to check if the plastic is overheated.
If the plastic is overheated, use a screwdriver to carefully loosen the screws one by one.
Once the mount is at a proper distance from the wall, tighten the screws at that point.
After the Samsung TV is mounted at a safe distance from the wall, turn it on.
If you don’t hear any buzzing noises, the problem is fixed.
There could be a problem with your power supply board or ports
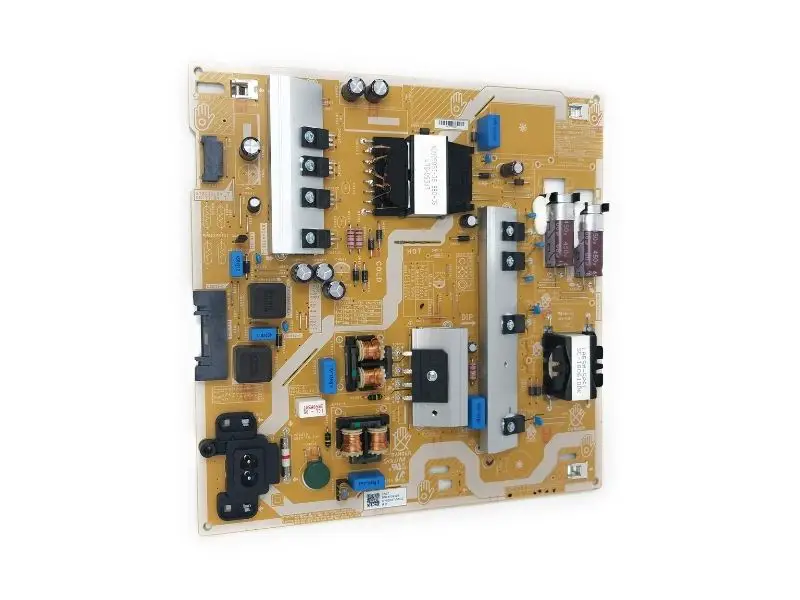
If your Samsung TV makes a buzzing sound, the problem might lie in the power supply board. When the supply board has worn out or is not properly connected to the mainboard. The cord attached to the main supply board can burn out or add extra voltage expanding or burning the plastic of the Samsung TV.
The following steps will help you analyze any damage to the supply board of your Samsung TV:
Locate the power supply board on the back of your Samsung TV.
It looks like a large circuit board.
Take out the supply board by removing the screws one by one.
Keep all the parts of the power supply board in a safe place.
If the circuit board seems damaged or swollen, replace it with a new one.
Check the range of your Samsung TV and get a new power supply board.
Place the new supply board in its designated space.
Fix it by carefully placing the screws in the right slots.
Once you have replaced the power supply board, cover it with the plastic lid.
Turn on your Samsung TV and listen for a buzzing sound.
If the buzzing noise stopped, the problem was with the supply board. If you continue to hear a buzzing noise then look for other solutions.
HDMI Ports Can Deform Due To Excessive Heat
HDMI ports help connect streaming devices with Samsung TVs. Sometimes the streaming devices can overwhelm the HDMI ports causing overmodulation or overheating. There is a high chance of Samsung TV making buzzing noises If there is damage to the HDMI ports. We have outlined a few steps to help you check whether the HDMI ports are working or not:
Unplug the supply cord from the HDMI port.
Plug the cord into the power supply port.
If the buzzing sound stops, it means that the problem is with the HDMI ports.
Replace the HDMI ports to resolve your problem.
Conclusion
Samsung TVs are energy efficient and work properly for a long time. They can run into errors after some time. If your Samsung TV making buzzing noise, then you need to find the root of the problem. Make sure you carry out each step correctly or the problem might worsen. If the buzzing noise stops then you can enjoy your Samsung TV without a hitch. If not, you can always contact Samsung support to provide you with quick solutions.
When using a Logitech webcam, the video shouldn’t be blurry. But, if this is the case, here’s what to do next.
If there’s one thing anyone wants from a webcam it’s clear picture quality. Whether video conferencing for work or simply catching up with friends from afar, there are many uses for a webcam.
Logitech is an electronics brand founded in 1981 in Switzerland. Today, the brand is recognised all over the world and they create everything from wireless Bluetooth headphones to computing and gaming accessories.
There’s no denying that Logitech is a ‘go-to’ brand for webcams, so let’s take a look at the issue of the video capture being blurry.
Envato Elements: Natabuena
Why is my Logitech c922 webcam grainy?
Webcams provide users with both audio and video connectivity. More often than not, consumers will go out of their way to purchase a good quality webcam for the advanced picture quality. If a webcam’s picture looks blurred, this can be for a variety of reasons.
The webcam may simply be out of focus. Check whether there is a dial around the camera lens in which you can adjust to change the video quality.
It’s also worth noting that webcams don’t do so well in low lighting, so ensure that you’re using it in a well-lit room when video conferencing.
How to fix a blurry Logitech webcam
Once the reason for the webcam being out of focus has been established, we can run through some troubleshooting tips.
Firstly, the device in which you’re using can be the cause for an out of focus webcam. Try using the webcam on a different device, such as a laptop if you were using a PC, to see if the issue still occurs.
Secondly, check the internet connection. If you’re experiencing a poor Wi-Fi signal or a located in a part of the house where Wi-Fi dips in and out, this can be the cause for a blurry webcam. In this instance, it would be advisable to install a Wi-Fi signal booster.
It may seem silly to check, but it could be that the packaging of the webcam (if new) is still covering the lens. Check that there’s no film over the camera preventing it from capturing quality video content.
Check that the correct drivers have been installed for the webcam. This is the software relevant for making the webcam work correctly. If installing a new webcam, ensure that you run through the on-screen steps before attempting to use it.
Simply closing down any applications that are using the webcam, then rebooting, can also refresh the hardware and get things working correctly.
Using a laptop and seeing “webcam not detected”?
If your laptop displays a message reading “webcam not detected”, this may come down to something as simple as apps not having permission to use the camera. To allow permission on a Windows 10 device please follow the steps below.
Start > Settings > Privacy > Camera > Turn ‘on’ Camera access for this device.
Apple menu > System Preferences > Security & Privacy > Privacy tab > Click Camera in the sidebar.
Select the tickbox next to the apps that you want to use your camera in. You might be prompted to quit and reopen an app before it can use your camera.
It can also be linked to faulty drivers – AKA the software used to make the camera work. In this instance, the best thing to do is uninstall, then reinstall, the camera.
Whether you’re staying at a hotel for work or leisure, there’s one thing for sure – you want your Macbook fully functioning.
Have you ever encountered the issue of being unable to connect your MacBook to a hotel WiFi network while traveling? This is a common problem that many MacBook users experience, and it can be caused by a variety of reasons.
In this article, we’ll explore the common causes behind this issue and provide practical solutions to help you get access to the internet wherever you are without compromising your computer’s security.
Photo by Andrew Neel from Pexels
It’s not just hotel WiFi, you could struggle in airports, cafes or on any other public WiFi
Remember that you are on a public Wi-Fi and to take appropriate security measures.
With all public WiFi, there is a bigger risk to your security online than in any other setting with so many different users connecting to the network
Macbooks are very good for your security as they require strong encryption for you to access the web via Safari which not all public WiFi can offer.
Three steps to help your Macbook connect to the hotel, airport or public WiFi
Click on Apple Menu, System Preferences, Network, choose Advanced and navigate to the DNS tab.
Delete any DNS addresses that you were using under the list of DNS servers, so that it now points only to the hotel server.
Click OK and reload the page. The sign-in page of the public WiFi should appear. Fill out your details if required. Once you Sign-in, you should be OK to browse the internet.
What to do if you still can’t connect
If a login screen still doesn’t appear, open a new Safari session. Then type this web address captive.apple.com into the address bar. This shows a non-secure page.
Try again to connect to the public WiFi’s welcome and login page. This problem usually happens with hotel WiFi networks and other public WiFi networks as they want you to access their local DNS server to sign-in.
Some people may see error messages, such as “Safari says it can‘t establish a secure connection” or that the website is using weak encryption. Safari requires that the websites you visit meet Apple’s standards for strong encryption.
If you wish, you can work around this error by using an alternate browser, like Firefox, Dolphin, or Google Chrome.
Hisense Smart TVs offer all the perks of any smart home entertainment system. Based on an Android OS, they support a wide range of apps and services that give you access to all kinds of services. With technology revolutionizing every day, older models quickly go out of date, with new and better versions replacing them. This doesn’t mean you cannot still access newer services and apps. You can find out how to get Disney Plus on older Hisense Smart TV.
Disney Plus is one of the most popular on-demand streaming services out there. With over 130 million subscribers worldwide, it is consistently ranked among the best streaming services available.
The service can be accessed through the online site and via the dedicated app. Some newer TVs have the app preinstalled, but older Hisense Smart TVs require a manual process to access Disney Plus.
Do older Hisense Smart TVs support Disney Plus?
The Disney Plus app is compatible with Android OS and can be accessed through the app or browser. Older Hisense Smart TVs support Disney Plus and should not have an issue with the app. Since the service came out in 2019, TVs older than that which are supported by the VIDAA OS could not originally adapt to Disney Plus.
Older Hisense Smart TVs may also need to be updated before you can install Disney Plus. Check for Firmware Updates under System Update. Once updated, you should have no problem with the app. All you have to do is to know how to get Disney Plus on older Hisense Smart TV.
How to access Disney Plus on Old Hisense Smart TV
Depending on the TV model you are using, you may first need to update your smart TV. Check the system version on your smart TV against the app requirements. Disney Plus requires Android OS 5.0 or later to function. Once your TV is up to date, you can then access Disney Plus. There are two main ways you can watch Disney Plus on an older Hisense Smart TV.
Download the Disney Plus App
You can simply download the Disney Plus app on an older Android Hisense Smart TV. To do so:
Navigate to Apps from the OK button on your TV remote
Select the Get More Apps option at the top of the screen
Locate the Disney Plus App in the options available, or search from the Search bar.
Select the Download button
Once the app is downloaded, it will be available from your home screen. All you need to do next is sign in and start viewing your favorite shows.
Chromecast Your TV
Older versions of your Hisense Smart TV that are not based on Android OS may not be compatible with the Disney Plus app. In that case, you can use a built-in Chromecast to view Disney Plus shows from your phone on your TV. You can do this by:
Opening the Disney Plus app on your phone and select the Cast option
Next, select your TV from among the list of devices that appear
Play your show on your phone
With Chromecast, you will still have to control and manage the app from your phone. It is generally a very simple process but can sometimes cause issues. In that case, you can try some fixes to get your Disney Plus Chromecast working on your TV.
Do Hisense Smart TVs Have Disney Plus?
Hisense Smart TVs were originally incompatible with Disney Plus, as they did not work with the VIDAA system. However, recently Hisense TVs have launched the latest version of the VIDAA platform, which has wider compatibility. Disney Plus comes preinstalled on later versions based on this system.
Older Hisense TVs with VIDAA or Roku do not have Disney Plus by default. Hisense Smart TVs can generally support Disney Plus, no matter the model. You will simply have to download the app from the Play Store. With systems that do not support the app, you’ll have to find out how to get Disney Plus on older Hisense Smart TV.
You have other options available in case the app is incompatible. You can try mirroring or Chromecast to your TV, as most Hisense Smart TVs support this feature. Alternatively, you can also invest in a streaming device that you can hook up to your TV.
Why can’t I access Disney Plus on my TV?
If you’re having trouble accessing Disney Plus on your TV, there may be a few reasons behind it. Check to see if:
Your smart TV or system is compatible with Disney Plus
Check your connection and ensure that it is stable
Check if there are any pending updates for the Disney Plus app
If you are having issues with the TV which are preventing access, try fixing the issue first. Try using Disney Plus on a different device to find out if the problem is caused by the TV or the app. Simply rebooting the TV or relaunching the app can often resolve the issue. You can also try clearing the app cache as that can sometimes overload, causing the app to crash.
Conclusion
Given the popularity of Disney Plus, more and more users now wish to access it on their TVs as home family entertainment. While the app even comes preinstalled on newer sets, older TVs may give a little problem with accessing the service. There are many ways on how to get Disney Plus on older Hisense Smart TV.
The process is perfectly simple, and the download only takes a few minutes. If downloading is not possible, you can try alternate methods, such as Chromecast or getting a third-party streaming device. These should work easily with older Hisense Smart TVs. In case you face any further issues, you can reach out for help.
If your Sony Xperia won’t charge but displays a Red light, you could be using a faulty charger with a damaged cable.
Have you recently accessed a suspicious site on your phone that could have downloaded malicious software onto your mobile?
A change in what device you use to charge your Sony Xperia, or a software repair can help rectify this issue.
We have generated this simple guide to explain why your Sony Xperia won’t charge with a Red light, as well as provide you with easy solutions you can execute, so you can regain power on your mobile.
What does the Red light mean on Sony Xperia?
If your Sony Xperia displays a red light, this will mean the phone is charging. This light should only appear when you have plugged your Sony in to its charging cable with it connected to a power outlet. If the red light is flashing, this will be a warning sign that there isn’t enough power to switch your Xperia back on.
If your Sony Xperia’s red light is blinking three times, you will need to leave your phone on charge for a while in order for it to gain more power. Only then should you turn it back on.
Once you charge your mobile up, you should be able to hold down the power button to turn it back on.
(Did you know; The first electrical product for Sony was a rice cooker. It did not succeed because the rice came out either undercooked or overcooked. Only 100 of these were sold when it was first manufactured).
This Sony Red light is under normal circumstances. However, if your Sony Xperia won’t charge while there’s a Red light there are possible reasons why this error is occurring;
Why is my Sony Xperia not charging?
Your Sony Xperia won’t charge if the battery has been completely discharged of its internal chemicals. When this happens, no amount of power will be able to charge the battery as it will be ’empty’. This can occur over a period of time, or if you have left your Xperia connected to power after the battery has fully charged.
Other reasons why your Sony Xperia won’t charge, and display a red light include;
1. Faulty charging cable
Your Sony charging cable could be damaged to the point that it won’t transmit any power when you connect your Xperia mobile.
This can occur if the internal wires have split or become too loose.
2. SD card interference
If you make use of a memory card in your Sony Xperia, this device could be the cause for your Sony to not charge.
For some reason, a SD card can cause an interference with your mobile receiving a charge.
3. Damaged power source
A broken power outlet (wall socket) won’t transmit any power when a device connects to it. You may have plugged your Sony Xperia charger into a plug socket that does not work.
4. Xperia software issue
The software on your device could have an issue with it that will prevent it from charging.
This can occur from corrupt files, or your device was manufactured with a faulty operating system, specifically if your Sony Xperia won’t charge with a red light only a few days after you received the mobile.
How to fix Sony Xperia won’t charge with red light
You will need to replace your Sony Xperia battery if it has been completely discharged. Once a battery gets completely depleted, you won’t be able to give it power as there will no longer be chemicals. You will be able to purchase a new battery at any mobile store. Sony recommend you charge your battery for eight to twelve hours.
Other methods you can follow to fix your Sony Xperia from not charging and displaying a red light are;
1. Replace charging cable
If the USB cable on your Sony Xperia charger is damaged, you will need to replace it, or alternatively, use a different power source to charge your mobile.
Previous Sony Xperia holders that experienced this very problem have reported that they got their Xperia to charge after they connected it through their laptop.
2. Remove SD card
If you make use of a SD card for added memory space, remove this from your Sony Xperia and put your mobile on charge.
If there is still a red light, your Sony should be charging. Turn your mobile on without the memory card and see if it powers on.
3. Change power outlet
If you plug your Sony Xperia charger into a faulty power outlet it won’t receive any power. Remove it and plug it into a different source.
4. Repair Sony Xperia software
The software on your Sony Xperia could be faulty, and need a repair or update.
To repair your Xperia software, you will need to use your PC, and first download the Sony application.
Step 1. Make sure your mobile is off and connect it to your PC with its cable
Step 2. On the Sony Xperia application download click ‘Software Repair’ under ‘Manage your Xperia’
Step 3. Make sure you tick ‘My device cannot be detected’
Press ‘Next’ and follow the on-screen instructions.
Tip, back up your phone’s data before you go ahead with this step to ensure you do not lose all your files.
How do I know if my Sony Xperia is charging?
There will be a notification light visible on your Sony Xperia when it’s charging. The colour of the light will change depending on the what percentage your battery is currently on when you connect it to a power source. Once your phone reaches a certain status, the colour of the light will change.
There are three different light colours that will show on your Sony Xperia when you place it on charge;
1. Red light
A Red light will indicate that your phone’s battery is completely depleted and won’t be able to switch on until it has regained enough power.
Note, If the battery is 100% drained, your Sony mobile can take up to thirty minutes before it will respond to any power. Your phone may seem like it won’t turn on as it won’t show the charging icon.
2. Orange light
An Orange light will appear when your Sony is currently on charge. This colour will confirm your mobile has power but is still not 100% charged.
3. Green light
The Green light will confirm your Sony’s battery has reached 95% power.
You can check the status of your Sony Xperia when it is charging. To do this, simply;
Step 1. Open Settings
Step 2. Select ‘About Phone’
Step 3. Choose ‘Status’
If you experience the charging light staying on after you have unplugged your Sony, restart your mobile.
Conclusion
With this easy to read guide, we hope we were able to pinpoint why your Sony Xperia won’t charge with a red light, and that one of our simple solutions provided, rectified this power issue.
If this problem persists, you may have a hardware error with your device, and will need to either get it repaired, or replaced.
You can make of Sony’s online support page. Here, you will be able to troubleshoot your mobile as well as complete an email form or call them.