Home Blog

How to Fix YouTube Playlists Not Showing Up

0

Are your YouTube playlists vanishing into thin air?

Some YouTube playlists have reportedly disappeared from both search results and the sidebar. Although the YouTube Team has acknowledged the issue, a resolution remains elusive. The precise cause is unknown, with multiple factors suspected, such as exceeding the maximum playlist limit, utilizing an outdated YouTube app, accumulating excessive cache, relying on browser extensions, or neglecting optimized titles and descriptions.

You can resolve the problem by clearing your browser and YouTube app cache, updating the YouTube app, and/or restarting your device. However, due to the various potential causes, fixing it isn’t always straightforward. In the following sections, we outline several methods to address the issue of YouTube playlists not showing up.

Clear Your Browser Cache

Browser cache is the temporary storage in your browser for keeping copies of web page elements such as images and scripts. It’s designed to speed up your webpages loading time by using the locally stored files instead of downloading them every time you visit a site. 

However, if your cached data becomes corrupted or overfilled, then it can cause issues like playlists not showing on YouTube. Clearing your Browser’s cache data is very simple. See below for the instructions on how to clear cache data in different browsers:

Google Chrome

  1. Open Google Chrome
  2. Navigate to the three dots at the top right of the screen and click.
  3. Select the “Clear Browsing Data” button.
  4. Toggle to the advance page and change the drop down to “All Time”.
  5. Make sure that ‘Cached image and files’ and “Cookies and other site data” is ticked.
  6. Save your changes by clicking ‘Clear Data’.
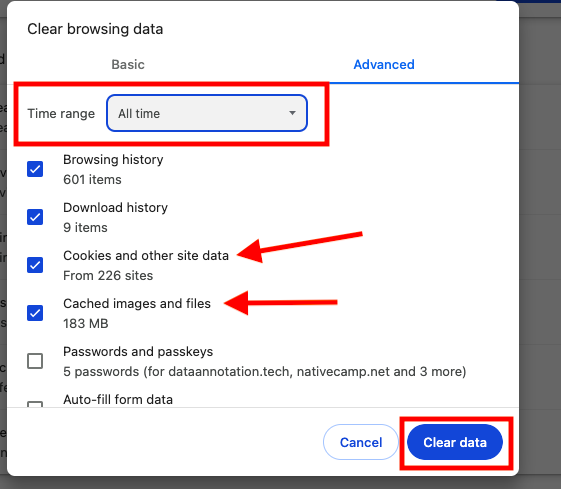
screenshot of clearing browsing data on Google Chrome

Safari

  1. Launch safari
  2. Navigate to the Safari button at the top of your left hand side of the screen and click.
  3. Click the Preferences button.
  4. Go to the privacy page.
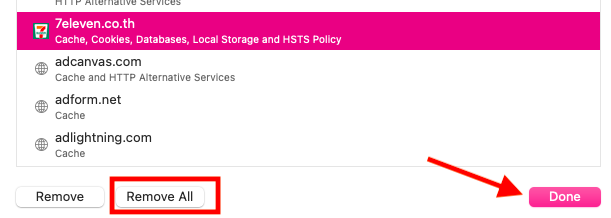
  5. Click the ‘Manage Websites Data’ button. A list will appear with all the websites that your device has stored data for. You can individually select sites you wish to remove data for or you can use the remove all button to remove all website data.
  6. Click Done.
Screenshot of Manage website data on safari

Restart Your Device

Restarting your device can often resolve errors such as the playlists disappearing, by refreshing your system settings and clearing temporary glitches.

If you are using a Computer/Laptop:

  1. Save any work you have open and then close all active applications.
  2. Click your PC’s “Start” or “Apple” menu.
  3. Choose “Restart” or “Shut Down.”
  4. Allow your computer to power off completely before turning it back on.
  5. Open your web browser, visit YouTube, and check for the playlists.

If you are using a Mobile (iOS/Android):

  1. Unlock your device.
  2. Press and hold the power button.
  3. Select “Restart” or “Reboot” from the menu.
  4. Wait a few moments for your device to restart.
  5. Launch the YouTube app and verify if the playlists are now visible.

Log Out and Back into Your YouTube account

Logging in and out of your youtube account can sometimes be a simple fix to eradicate any account issues. Youtube is available in different mediums so below we have listed the steps on how to log in and out on different platforms.

Web Browser:

  1. Launch your web browser.
  2. Open Youtube.
  3. Log out of your account by clicking your profile photo, and clicking sign out.
  4. The Youtube homepage will reload. Click the Sign in button in the top right corner.
  5. Sign into your account by selecting your google account and inputting your password.

Youtube App:

  1. Launch the YouTube app.
  2. Log out of your account then tap “Sign In” if not already signed in.
  3. Enter your login details.

Clear Your YouTube Cache

YouTube cache is the temporary storage of data on your device. It ensures that your videos load faster by storing information locally. However, if overtime your account complies too much cache it may cause issues like your playlists not showing.

Regularly clearing your cache can help your youtube account fetch the latest data from YouTube’s servers.

To clear your YouTube Cache on a Web Browser:

Google Chrome:

  1. Open Chrome and go to YouTube.
  2. Press `Ctrl+Shift+Delete` (Windows/Linux) or `Command+Shift+Delete` (Mac) to open the “Clear browsing data” menu.
  3. Select “Cached images and files” and ensure other options are unchecked unless you want to clear other data.
  4. Click “Clear data.”

To clear your YouTube Cache on a Mobile Device:

Android (Google Chrome):

  1. Open the Chrome app and go to YouTube.
  2. Tap the three dots in the upper right corner.
  3. Select “History” and then “Clear browsing data.”
  4. Check “Cached images and files” and tap “Clear data.”

iOS (Safari):

  1. Open the Settings app on your iPhone or iPad.
  2. Scroll down and tap on Safari.
  3. Scroll down and tap “Clear History and Website Data.”
  4. Confirm your choice by tapping “Clear History and Data.”

To Clear your YouTube Cache on a Smart TV or Streaming Device:

Smart TVs (Samsung, LG, etc.):

  1.  Load up the YouTube app on your TV.
  2.  Go to the app settings or options.
  3.  Look for an option related to cache or temporary files.
  4.  Follow the on-screen instructions to clear the cache.

Ensure your Youtube is Up to Date

he YouTube team consistently releases app updates to address bugs and enhance performance. If you’re experiencing issues like missing playlists, updating to the latest version of the app is likely to resolve these issues.

  1. Launch your App Store.
  2. Go to the Apps page.
  3. Any Apps that have an available update will appear at the top of the page wit an ‘Update’ button.

Disable Browser Extensions

Browser extensions can sometimes cause conflict with Youtube causing your playlists to not appear. If you suspect that your browser extension is the problem then you can disable it by using the following steps:

Google Chrome:

  1. Open Google Chrome.
  2. In the top-right corner, click on the three vertical dots to open the menu.
  3. Hover over “More tools” in the menu.
  4. In the submenu, click on “Extensions.”
  5. Alternatively, you can type `chrome://extensions/` in the address bar and press Enter.
  6. Find the extension you want to disable and toggle the switch next to it to the off position (gray).
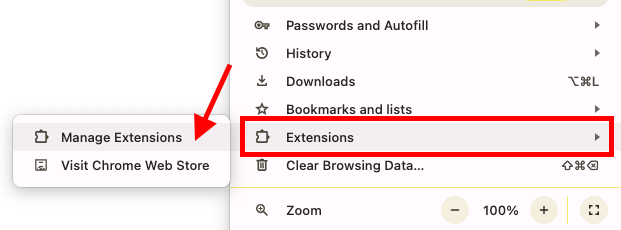
screenshot of google chrome extensions page

Safari (Mac):

  1. Open Safari.
  2. In the top menu, click on “Safari.”
  3. Select “Preferences.”
  4. Go to the “Extensions” tab.
  5. Find the extension you want to disable and uncheck the box next to it to disable it.

After disabling an extension, it is usually a good practice to refresh the webpage or restart the browser to apply the changes. If you ever need to enable the extension again, simply revisit the same menu and toggle the switch back to the on position.

Rename to Optimize the Playlist Title and Description

  1. Launch Youtube and go to Your Channel and click Manage Videos.
  2. Tap the Playlists button.
  3. Hover over the playlist name until the pencil icon appears called “Details”.
  4. Evaluate how well your current playlist title and description relates to your desired keyword. Use Chat GPT if you need help improving your title and description. 
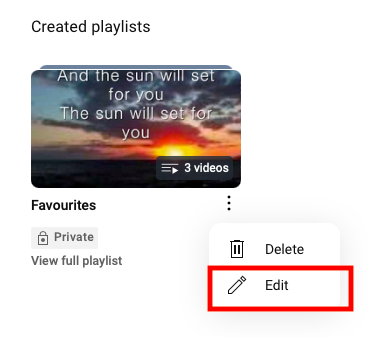
screenshot of created playlists in YouTube

Change your Privacy Settings

  1. Open Youtube and go to Your Channel and click Manage Videos.
  2. Tap the Playlists button.
  3. Hover over the playlist name until the icons appear. Click the pencil icon called “Details”.
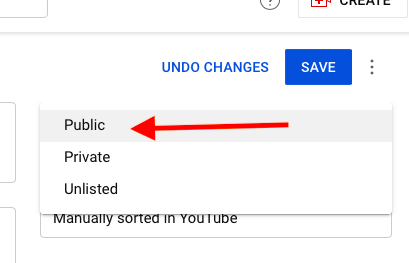
  4. Make sure that your Playlist Visibility is set to Public not Private or Unlisted.
Contact Youtube Support Team

If none of the above fixes bring back your playlists then you should consult the Youtube Help page or contact the Youtube Support Team. To contact the Youtube Support Team:

  1. Visit the Youtube Help Center 
  2. Look through the Browse Help Topics list, if no guides can assist you then go to the Community page.
  3. Post a Question to the Help Community. Make sure to write clear and detailed answers for each question step. Confirm and post once done.


WeChat Not Receiving Messages: 7 Causes & Solutions

WeChat allows you to send texts, make video and audio calls, and even complete mobile payments, but some users report that they are not receiving any messages unless the app is active.

If the WeChat app is not receiving messages, you may have accidentally disabled the background data activity for the app on your phone, or the WeChat service is down. To resolve this issue, open your phone settings and toggle on “Allow Background Data Usage” or “Background App Refresh” for the WeChat app.

In this article, we’ll explore why you can’t receive messages via the WeChat app and share with you some steps to troubleshoot this annoying glitch.  

Why am I not receiving messages on WeChat?

If you use WeChat and are not receiving messages unless you open its app, this could happen due to one of the following reasons:

  • Issues with the internet connection. 
  • You’ve disabled the background data usage or background app refresh option for the app.
  • Data saver or low data mode is enabled on your phone. 
  • Notifications are disabled for WeChat.
  • You’ve restricted the battery usage for WeChat or put it in a deep sleep on Android.
  • WeChat service is down. 
  • Bugs in the WeChat app background process.
  • Outdated app.

What to do when the WeChat app is not receiving on WeChat?

What to do when the WeChat app is not receiving on WeChat?

If the WeChat app is not receiving any messages on your phone, try these 7 step-by-step methods to resolve the issue.

Force Stop the App

The first solution to start receiving messages on WeChat is to force stop it. Doing so will reset all the background processes on the app and clear out any bugs that are responsible for this issue. Here’s how:

Android: 

  • Open Android “Settings.”
  • Tap “Apps.”
  • Tap “All Apps.”
  • Select “WeChat.”
  • Tap “Force Stop.”

iOS:

  • Swipe up and stop in the middle on your iOS device’s home screen to access Recent Apps.
  • Scroll right through the apps to find WeChat.
  • Swipe up on the WeChat preview to force quit it.

Afterward, open the WeChat app again and check whether the problem persists.

Turn On Background Data Activity for WeChat

Background Data Usage or App Refresh is a feature on your device that allows the apps to update and refresh the data online even while you are not actively using them. 

But if you’ve disabled this feature for WeChat, it won’t fetch new information over the internet, and you may not receive messages in real-time.

To ensure that the app stays updated and continues to receive messages, follow these steps:

Android: 

  • Open Android “Settings.”
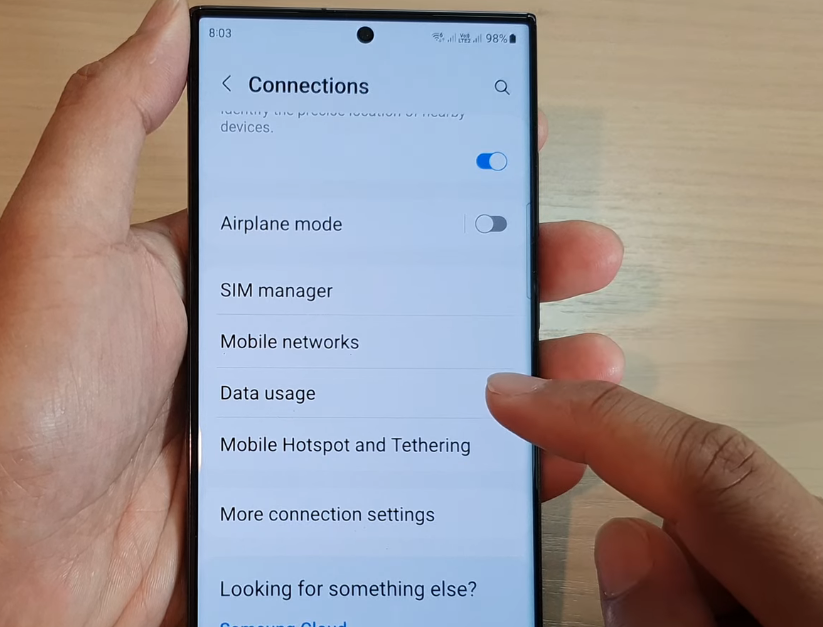
  • Tap “Connections.”
  • Tap “Data Usage.”
turning on background data usaga for WeChat
  • Select “Mobile Data Usage.”
  • Select “WeChat.”
  • Toggle on “Allow Background Data Usage.”

iOS:

  • Open iOS “Settings.”
  • Select “General.”
  • Tap “Background App Refresh.”
  • Toggle on “WeChat.”

Once you do that, open “WeChat” and check whether the problem recurs.

Disable Data Saver or Low Data Mode

The data saver or low data mode on your device limits the background data usage of the apps when you are using mobile data. In case you’ve enabled this feature, this could be why you are not receiving any messages on the WeChat app.

So, the quick fix here is to disable “Data Saver” or “Low Data Mode” on your device by following the steps given below:

Android:

  • Open Android “Settings.”
  • Tap “Connections.”
  • Tap “Data Usage.”
  • Select “Data Saver.”
  • Toggle off “Turn on Now.”

iOS:

  • Open iOS “Settings.”
  • Tap “Cellular.”
  • Select “Cellular Data Options.”
  • Tap “Data Mode.”
  • Select “Standard” (or “Allow More Data on 5G”) instead of “Low Data Mode.”

Next, force stop and re-open the WeChat app, and confirm you are receiving the texts now.

Enable WeChat Notifications

You might have disabled WeChat notifications on your device, due to which you are not getting notified of new messages until you open its app. 

To fix this, enable the WeChat app notifications with these instructions: 

  • Open the “WeChat” app.
  • Tap “Me.”
  • Select “Settings.”
  • Select “Message Notifications.”
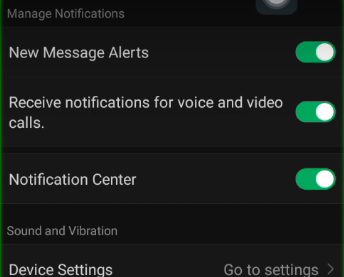
  • Toggle on “New Message Alerts.”
Turn on messages alerts in WeChat

NOTE: Do check the notification settings for WeChat on your mobile device and turn them on. 

Allow Battery Usage for WeChat (Android Only)

Android devices let you optimize the battery usage for individual apps or put them in a deep sleep to conserve power. But this feature stops the WeChat app from working in the background, resulting in delayed or no message reception.

Therefore, it’s best to allow unrestricted battery usage for WeChat. Here’s how:

  • Open Android “Settings.”
  • Choose “Battery” or “Battery and Device Care.”
  • Choose “Battery Usage.”
  • Tap “WeChat.”
  • Tap “Unrestricted.”

If you are using Android with One UI, do these steps to remove the WeChat app from the deep sleep state:

  • Open Android “Settings.”
  • Tap “Battery and Device Care.”
  • Choose “Battery.”
  • Tap “Background Usage Limits.”
  • Choose “Deep Sleeping Apps.”
  • Tap the three dots (top right side of the screen). 
  • Choose “Remove.” 
  • Select “WeChat.” 
  • Tap “Remove.” 

Then, open the WeChat app or check your notifications, and hopefully, you’ll start receiving messages. 

Check the Internet Connection

WeChat strongly relies on active Wi-Fi or cellular data connection to send or receive messages and make calls. However, if your internet connection is unreliable, the app won’t perform at its optimal capacity, leading to issues such as delayed message delivery. 

To verify if this is the culprit, run a speed test on your network connection. In case it’s below the minimum requirements, do these steps to troubleshoot the problem:

  • Turn on and off the Airplane mode on your device (to re-establish a strong connection with the service provider). 
  • Close all the background apps or download processes that might be utilizing too much internet bandwidth on your device. 
  • If possible, switch to a reliable Wi-Fi connection from your cellular data. 
  • Restart your router (to refresh the internet connection).

Update WeChat

Another solution to fix this issue is to update the WeChat app to the latest version on your device. Here’s how:

  • Open “Play Store” / “App Store.” 
  • Look for “WeChat.”
  • Tap “Update” (if this option is available). 

Let the update process complete; open WeChat and the issue should be resolved.

INFO: Sometimes, WeChat experiences downtime due to scheduled maintenance or technical issues due to which you may stop receiving your messages. So, check the WeChat server and wait for its tech team to resolve the issue at their end. 

If all else fails, delete the WeChat app on your device, reinstall it again, and sign up for a new account.

Why Does Fortnite Keep Kicking Me Out? 11 Fixes

Does Fortnite keep kicking you out of your matches and you have no idea why? In this guide, we will help you work out if Fortnite is purposely giving you the boot or if there’s a technical hiccup causing your game to crash and kick you out. 

Typically, Fortnite kicks players from matches for three main reasons: using a VPN, violating the code of conduct, or experiencing internet lag. However, technical glitches like corrupt game files, an overheated system, or an outdated graphics driver can also lead to Fortnite crashing and booting players out of the game.

In this guide, we cover three reasons why you might be intentionally booted from Fortnite, along with eleven technical issues you might encounter and their corresponding solutions.

If you have received the “we have hit a roadblock” error message then Fortnite has decided to kick you from your match for one of the following reasons:

  1. Your Internet is lagging
  2. You Tried to Cheat
  3. For using a VPN

1. Your Internet is lagging

Lagging internet can disrupt the transfer of data within the Fortnite servers, causing delays and potential disconnections. Fortnite relies on a stable internet connection in order to function properly.

2. You tried to cheat

Fortnite upholds a strict code of conduct to ensure fair play in the game. If you have attempted to cheat through using third-party software then this is a violation of the rules and can lead to being banned from the game.

3. For using a VPN

VPNs are strictly prohibited from being used in order to access the game. If your IP is already banned due to rule violations, attempting to use a VPN to bypass the ban violates terms of service and may result in removal from the game.

Below, we have outlined 11 technical issues you may be experiencing and how to fix them to get back to gaming as soon as possible:

  1. Check your Wifi Connection
  2. Run the Epic Games Launcher as an Administrator
  3. Close background apps
  4. Check your system meets minimum requirements 
  5. Repair C++ Redistributables
  6. Force Fortnite to use DirectX11
  7. Verify your Game Files
  8. Check for Game updates
  9. Adjust your compatibility mode
  10. Check your Graphics Card Driver
  11. Turn off GPU Overclock

1. Check your wifi connection

When any online game goes down, the first thing to investigate is your wifi connection. If you notice fewer bars than usual, it could indicate a speed deficiency or a weak signal reaching your PC, potentially leading to Fortnite kicking you out of the game.

Fortnite demands a minimum of 5Mbps download speed and 3 Mbps upload speed. If you find that your Wi-Fi doesn’t meet these criteria, you can improve your connection by either moving your PC closer to the Wi-Fi router or employing a signal booster.

Close up photo of router

2. Run the Epic Games Launcher as an Administrator

Running an application as an administrator can minimize your chance of being kicked out of a game because administrators typically have elevated system permissions and increased compatibility. 

To run Fortnite as an Administrator, follow the below steps:

For Windows:

  1. Visit your Desktop
  2. Hover over the Epic Games Launcher Shortcut icon and right click.
  3. Scan down the dropdown list and select ‘Run as Administrator’.
  4. Epic Games Launcher will now open as Administrator. 

For Mac:

  1. Open your Finder and navigate to the Applications folder.
  2. Find the Epic Games Launcher application.
  3. Right-click (or Control-click) on the Epic Games Launcher.
  4. Choose “Get Info” from the dropdown.
  5. In the Get Info window, check the box next to “Open using Rosetta” if you are using an M1 Mac.
  6. Close the Get Info window.
  7. Double-click on the Epic Games Launcher to run it with administrator privileges.
Screenshot of dropdown menu for Fortnite icon on desktop screen

3. Close background apps

For an optimal Fortnite gaming experience, make sure to close all other applications. Given Fortnite’s demand for substantial RAM, shutting down competing programs helps avoid resource conflicts, ensuring a smoother gameplay without the risk of being kicked out.

To easily close unnecessary background programs, use your task manager. Follow the steps below:

For Mac:

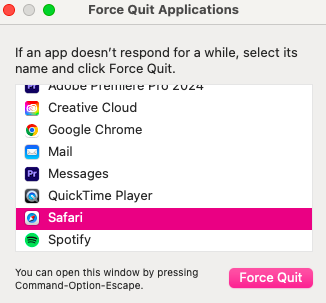
Press CMD + ALT + ESC simultaneously to access and force quit specific applications.

For PC:

Press CTRL + SHIFT + ESC together to open the Task Manager.

Screenshot of Force Quit Applications box on a Mac

4. Check your system meets the minimum requirements

In order for Fortnite to run efficiently on your PC your system must meet the minimum specifications listed below. If your system is falling short for any of these requirements then don’t be surprised if you are frequently being kicked out of the game.

The minimum system requirements are:

  • Graphics Card: Intel HD 4000 on PC, AMD Radeon Vega 8
  • Processor: Core i3-3225 3.3 GHz
  • Memory: 8GB RAM
  • OS: Windows 10 64-bit

However the recommended requirements are: 

  • Graphics Card: Nvidia GTX 960, AMD R9 280, DX11 GPU
  • Graphics Memory: 2GB VRAM
  • Processor: Core i5-7300U 3.5GHz, AMD Ryzen 3 3300U 
  • Memory: 16GB RAM or higher 
  • Hard Drive: NVMe Solid State Drive
  • OS: Windows 10/11 64-Bit
Photo of gaming setup

To check your system’s current specifications on a PC:

  1. Click the Start button on your desktop.
  2. Search for System Information in the search bar.
  3. Click System Summary. This will show you the information for your OS Name, Processor and Memory. Make a note of this.
  4. Navigate to the Plus symbol next to ‘Components’.
  5. Select Display from the drop down list. This will show you your Graphic cards information. 
  6. Compare your systems specification to the minimum requirements.

To check your system’s current specifications on a Mac:

  1. Tap the Apple icon in the top left corner of your screen.
  2. Click ‘About This Mac’.
  3. All the information you require is on the Overview page. Make note of the Processor, Memory, and Graphics information. 
  4. Compare your systems specification to the minimum requirements.

If you discover that your system is inadequate then you should make the necessary changes to bring your system above the required specifications.

5. Repair C++ Redistributable’s

The Fortnite game is one of many Software that have been developed with Microsoft Visual C++ . This software relies on a set of files known as Visual C++ Redistributables in order to function properly.

That’s why, if your Visual C++ Redistributables are missing, outdated, or corrupted, your Fortnite game may crash, triggering you to be kicked from your match.

It is crucial to keep these files up to date, and you can easily download them from the Microsoft website by following these steps:

  1. Open the above provided link.
  2. Download both X86 and X64 architectures using the provided links.
  3. Locate the downloaded files and open them.
  4. ‘Run’ the files.
  5. Wait for the installation to be completed.
  6. Restart your PC and then launch Fortnite.

6. Force Fortnite to use DirectX11

Using DirectX12 upon launching Fortnite has been identified by the Epic Team as a known trigger for the game crashing. If you are being kicked from matches then switching back to DirectX11 may resolve the issue.

To revert to DirectX11, follow these steps:

  1. Open the Epic Games Launcher.
  2. Navigate to the top-right corner and select your profile initials.
  3. Click the Settings button.
  4. Scroll down the page and click on the drop-down for ‘Fortnite.‘
  5. Tick the box next to “Additional Command Line Arguments”; a field box should appear underneath.
  6. In this box, type “d3d11” (ensuring all letters are lowercase) and then reopen Fortnite.

If you decide to return to DirectX12 at any point, simply remove the code from the field box and untick “Additional Command Line Arguments.”

Screenshot of Fortnite settings page

7. Verify your Game Files

Files might get corrupted if a download is incomplete or executed improperly. When your computer can’t interpret files correctly or they’re placed incorrectly, the program won’t work as expected. I.e. Kicking you from your matches.

Luckily, Epic Games has its own built-in verification tool in the launcher, and it’s straightforward to use:

  1. Open your Epic Games Launcher.
  2. Go to the Library page.
  3. Find Fortnite and click on the three dots in the bottom right corner of the box.
  4. Select the Manage option.
  5. Click on Verify.
Screenshot of Fortnite manage page

8. Check for Game updates

Developers regularly release updates for games, so if you’re still playing an outdated version of Fortnite, you might get kicked from a match and require an update.

To check if a new update is available: 

  1. Open the Epic Games Launcher.
  2. Navigate to the Library page.
  3. Look at the status listed under the Fortnite title. If you see “Update” then click the Fortnite title and it will automatically start loading the newest update of the game in your Downloads tab.

9. Adjust your Compatibility mode

Frequent crashes in the Fortnite game may be resolved by adjusting your compatibility mode. To adjust your compatibility mode:

  1. Head over to your desktop.
  2. Click open your desktop files.
  3. Locate where your Fortnite folder is. Typically you can find the folder under – Local Drive – C Drive > Fortnite > FortniteGame > Binaries > Win64
  4. Scroll down the file names until you see:FortniteClient-Win64-Shipping.exe.
  5. Hover over the file and right click to open the dropdown menu. 
  6. Select ‘Properties’.
  7. Click the ‘Compatibility’ tab and tick the box next to Display Full screen optimizations.
  8. Click Apply then Ok.
  9. Reopen Fortnite back up.
Screenshot of FortniteClient Win64 Shipping Properties - compatibility window

10. Check your Graphics Card Driver

Ensuring that your graphics card drivers are up to date is crucial. While graphic cards typically update drivers automatically, an update might be overlooked, leading to incompatibility with the Fortnite game and causing you to be kicked out.

If your drivers are outdated, you will need to manually update them. The three main providers for drivers are AMD, Nvidia and Intel but it’s important you identify your specific driver manufacturer.

Once you have determined your manufacturer, use the above-provided links to visit their website and download the latest update. Here’s a step-by-step guide on how to check and update your Graphics Card:

  1. Click the Start button in the bottom left corner of your screen.
  2. Type ‘Device Manager’ in the search bar.
  3. Tap on Device Manager.
  4. From the drop-down, select Display Adapters.
  5. Locate your card’s manufacturer and download the relevant update.
  6. Right-click on your Graphics Card.
  7. Click Update and search for automatic updates.
  8. The program should identify your Driver update.
GPU

11. Turn off GPU Overclock

Many gamers love overclocking their GPU because it ramps up performance by boosting clock speeds and optimizing resources. It can even breathe new life into older hardware. But there’s a downside: it might make your PC run hotter, gulp more power, and can cause stability issues like kicking you out of your game.

If you are being kicked out of your game, then it’s worth checking if your GPU overclock is to blame. To find out, try turning it off:

  1. Reset your Overclocking software to its default settings.
  2. Use your Driver settings to restore defaults.
  3. Head into BIOS/UEFI and reset overclocking settings.
  4. Restart your computer after making these changes to ensure they kick in.

7 Fixes For Fortnite’s Athena Crash Reporter

Has the Athena crash reporter brought your gaming to a halt? Fortnite’s athena crash reporter has been wreaking havoc for many PC gamers – but what triggers the crash and how do you fix it?

Athena crash reporter is predominantly caused by using DirectX12 and/or if your Graphics card is outdated. The most effective way to resolve athena crash is to revert back to using DirectX11.

Below, we have outlined 7 easy fixes for Athena crash reporter to get you back to gaming in no time.

  1. Check your Graphics Card and Drivers
  2. Force Fortnite to use DirectX11
  3. Verify your Game Files
  4. Turn off GPU Overclock
  5. Download Media Feature Pack
  6. Check your Wifi Connection
  7. Repair C++ Redistributable’s

1. Check your Graphics Card and Drivers

It is important to check that the drivers for your graphics card are up to date. Typically graphic cards will automatically update the driver but occasionally an update might be missed, causing your driver to no longer be compatible with the Fortnite game.

If your drivers are outdated, then you will need to manually download the latest software and update them. There are 3 main providers for drivers – AMD, Nvidia and Intel but you will need to check who your driver manufacturer is. 

Once you have found your manufacturer, use the above links to navigate to their website and download the correct update. You then to check your Graphics Card: 

  1. Click the Start button in the bottom left corner of your screen
  2. Type in the search bar ‘device manager’
  3. Tap on Device Manager button
  4. From the drop down, select Display Adapters
  5. Look for the manufacturer of your card and download the relevant update
  6. Right click on your Graphics Card
  7. Click update and then search for automatic updates
  8. Your Driver update should be located by the program

What is a Graphics Card and how is it different from a Driver?

Your graphics card is the hardware that renders graphics, while your graphics driver is the software that enables the operating system to communicate with and control your graphics card. Your graphics driver acts as a middleman between your software and hardware ensuring it functions properly.

Photo of GPU Hardware

2. Force Fortnite to use DirectX11

Using DirectX12 when launching Fortnite, has been identified by the Epic Team as a known cause of the Athena crash report. If you are experiencing the crash error then changing back to DirectX11 may resolve the issue.

You can regress back to DirectX11 by doing the following: 

  1. Open the Epic Games Launcher
  2. Navigate to the top-right corner and select your initial
  3. Click the Settings button
  4. Move down the page and click open on the drop down for ‘Fortnite’
  5. Tick the box next to Additional Command Line Arguments. A field box should appear underneath.
  6. Type in this box d3d11 (make sure all letters are lowercase) then reopen Fortnite.

    If at any point you want to revert back to DirectX12 then simply remove the code from the field box and untick Additional Command Line Arguments.
Screenshot of Fortnite settings page

3. Verify Your Games Files

Files can become corrupted during a download that is either incomplete or improperly executed. If your computer struggles to correctly interpret the files or if they are in the wrong location, the program will not function as intended.

Thankfully, Epic Games have their own built in verification tool in the launcher which you can easily use:

  1. Open up your Epic Games Launcher
  2. Click on the Library page
  3. Navigate over to Fortnite and click on the 3 dots in the bottom right corner of the box
  4. Tap the Manage button
  5. Click on Verify
Screenshot of Fortnite settings

4. Turn off GPU Overclock

Overclocking GPU is a popular practice for gamers as it boosts performance by increasing the clock speeds, optimised resource use and can extend the life of older hardware. However, it can cause your PC to overheat, increase power consumption and may lead to stability issues like the athena crash reporter. 

If you are experiencing Fortnite’s athena crash then you should consider turning off your GPU Overclock to evaluate if it’s causing the issue.
You can turn off your GPU Overclock by resetting the following places:

  1. In your overclocking software, reset to default settings.
  2. Go to your driver settings and use the option to restore to default.
  3. In BIOS/UEFI, access your overclocking settings and reset.
  4. After making all these changes, restart your computer for the changes to take effect.
Overclock software for GPU

5. Download Media Feature Pack

If you are using a Windows operating system and experiencing an athena crash then you may want to consider downloading the Windows Media Feature Pack.

It is an additional software by Microsoft that adds multimedia features (like Windows Media Player and codecs) to specific Windows editions that are lacking them due to legal reasons such as N and KN editions.

You can download the Windows Media Feature Pack here. Once downloaded, restart your PC and relaunch the Fortnite game.

6. Check your Wifi Connection

Visit the WiFi icon on your PC. If you’re experiencing less than optimal signal strength (fewer bars), it could be triggering Athena crashes. If you do discover your Wifi is poor, you can enhance your WiFi by relocating closer to your router or by investing in a signal booster for an improved gaming connection.

Close up of a wifi router

7. Repair C++ Redistributable’s

Programs built with Microsoft Visual C++ require a set of files called Visual C++ Redistributables in order to work. One of these programs is the Fortnite game. 

Nonetheless, if your Visual C++ Redistributables are absent, outdated or damaged then your game will crash, triggering the athena crash reporter. 

It is imperative these are kept up to date and can easily download from the Microsoft Website. Simply:

  1. Open the above link.
  2. Download architecture’s X86 and X64 using the provided links.
  3. Go to your download files and open the files.
  4. ‘Run’ the file.
  5. Wait for the installation to be completed 
  6. Restart your PC and then launch Fortnite.

Hotel Wifi Connected But No Internet – 6 Reasons and Fixes

0

Have you checked into a hotel, connected to the hotel wifi, but there is no internet access?

If the wifi status on your device says “Connected,” but you still have no internet, this can occur when you can’t access the hotel’s login portal. To fix this, copy the “IPv4 Default Gateway” address under “Network” > “Open Network and Sharing Center” > “Status” > “Properties,” and paste it into the browser. You’ll then be redirected to the hotel wifi’s login page; enter the password, and you will be able to regain access to the internet.

In this article, we’ll explain why your hotel wifi shows the “Connected” status but provides no internet access on your device and in what ways you can get rid of this pesky issue. 

Why does the hotel wifi say connected but there is no internet access?

Below are some of the reasons why your hotel wifi says “Connected,” but you have no internet.

  • Corrupt network settings. 
  • Authentication issues.
  • Opening an encrypted web page.
  • The “HTTPS Everywhere” extension is causing conflict with the Wi-Fi network.
  • Using VPN or proxy service on the device.

How do I fix my hotel wifi when it says it is connected but gives no internet access?

connecting to wifi on phone

If the hotel wifi says “Connected,” but there is no internet connection, try these 6 step-by-step methods to fix this problem quickly. 

Manually Enter the Default Gateway

Some hotel wifi connections require you to accept terms of service through a login page or captive portal. However, if this page does not appear when you connect to the hotel Wi-Fi network, it won’t provide you with the internet. 

The easy fix here is to manually enter the “Wi-Fi IPv4 Default Gateway” into your computer’s browser this way:

  • Right-click the “Network” icon (in the “Taskbar”).
  • Choose “Open Network and Sharing Center.”
  • Click “Status.”
  • Select “Properties” (below your hotel Wi-Fi network).
  • Paste the copied “IPv4 Default Gateway” into the browser’s search bar.
  • Open a browser.
  • Paste the “IPv4 Default Gateway” into the search bar. (that you’ve copied earlier)
  • Press “Enter.” (keyboard)

You’ll be redirected to the hotel wifi’s terms of service/login page; enter the password and see if the problem persists. 

TIP: If you are facing this issue on your phone, simply forget the hotel’s network and reconnect to its Wi-Fi, and this will bring up the login page on your device’s browser. 

Use HTTP Protocol

Opening an encrypted web page prevents the network from redirecting you to the hotel Wi-Fi captive portal or login page to keep your data secure.

Therefore, try loading a non-HTTPS site like http://www.yahoo.com/ to let the network intercept your request and redirect you to the login portal. 

In case this doesn’t work, you may have installed the “HTTPS Everywhere” extension on your browser, which you need to disable this way: 

  • Open Chrome.
  • Click the three dots. (menu)
  • Choose “Extensions.”
  • Select “Manage Extensions.”
  • Toggle off “HTTPS Everywhere.” 

Next up, reload the web page on the browser and check whether this fixes the issue. 

NOTE: If you’ve activated an ad, Javascript, or content blocker in Chrome, it may also block the resource to load the captive web portal of the hotel Wi-Fi and prevent you from accessing the internet. So, ensure to disable them temporarily in the browser.

Disable VPN and Proxy Service

When you connect to a VPN service, it creates an encrypted tunnel between your device and its server for all your internet traffic. 

For this reason, the hotel Wi-Fi struggles to detect any web traffic and won’t redirect you to its default captive portal to provide internet. The quick fix here is simply disconnecting the VPN service on your device.

If you’re using a proxy server for LAN on your computer, the same problem can occur. So, follow these steps to change the proxy settings: 

  • Press “Win+R” (on the keyboard).
  • Type in “inetcpl.cpl.”
  • Click “Connections.”
  • Click “LAN Settings.”
  • Uncheck “Automatically Detect Settings.”
  • Disable “Use a Proxy Server For Your LAN.“
  • Click “OK.”
disabling proxy service on computer

Open the browser on your computer and see if you are directed to the hotel wifi software for internet access. 

Use the Network As Is

Some users report that selecting the “Use This Network As Is” option on the blank hotel wifi login page also helped them resolve this frustrating issue. Here’s how: 

  • Select the “Click Here To Sign In” notification on your screen after connecting to the hotel Wi-Fi.
  • Click the “Use This Network As Is” (in the upper right corner of the blank login page)
  • Turn off the Wi-Fi on your device for a few seconds and turn it back on.

Connect to the hotel wifi, and the full login page will appear on your screen. Enter the password or accept the terms of service to get the internet. 

Run Network Troubleshooter

The next solution to fix this issue is to run the network troubleshooter on your computer.

  • Right-click the “Network” icon. (in the taskbar)
  • Click “Open Network and Internet Settings.”
  • Click “Status.”
  • Select “Network Troubleshooter.”
  • Select “Wi-Fi.”
  • Choose “Next.”
Running network troubleshooter

Let the troubleshooting process complete and take the necessary actions to fix the issues. 

If you are getting the “Can’t Reach the DHCP Server” error after running the troubleshooter, then your computer might not be getting the IP address from the server. The workaround here is to flush the DNS service on your PC with steps:

  • Click “Search.” (on the taskbar)
  • Type in “Command Prompt.”
  • Choose “Run as Administrator.”
  • Type in the following commands one by one (in the Command Prompt window) and hit “Enter”:
  • netsh winsock reset
  • nets int ip reset
  • ipconfig /release
  • Ipconfig /renew
  • ipconfig /flushdns
Running commands in Command Prompt

After running these commands, reconnect your computer to the hotel wifi, and hopefully, you can restore internet access this time. 

Reset the Network Settings

If all else fails, reset the network settings on your device to clear out any misconfigurations causing this issue. Here’s how: 

Android:

  • Open Android “Settings.”
  • Tap “General Management.”
  • Tap “Reset.”
  • Select “Reset Network Settings.”
  • Tap “Reset Settings.”
  • Tap “Reset.”

iOS:

  • Open iOS “Settings.”
  • Go to “General.”
  • Tap “Transfer or Reset iPhone.”
  • Tap “Reset.”
  • Select “Reset Network Settings.”
  • Enter your iPhone passcode if asked and tap “Reset.”

Windows: 

  • Right-click the “Wi-Fi” icon. (in the taskbar)
  • Select “Open Network and Internet Settings.” 
  • Click “Status.”
  • Click “Network Reset.”
  • Choose “Reset Now.”
  • Click “Yes.”

Restart your device to complete the reset process, and then reconnect to the hotel wifi to verify the fix.

Where Does CapCut Save Videos?

0

After dedicating hours to perfecting your masterpiece, you save your video, only to realize that your CapCut creation has miraculously vanished. The question arises: where does CapCut save your video?

CapCut saves your videos in different locations depending on what device you use. On an iPhone, Capcut saves your video directly to your camera roll. On Desktop, your videos are exported into the Projects folder under your User account.

In this article, you will learn exactly where to find your exported CapCut videos on your mobile and desktop devices. 

Where does Capcut save videos on a mobile?

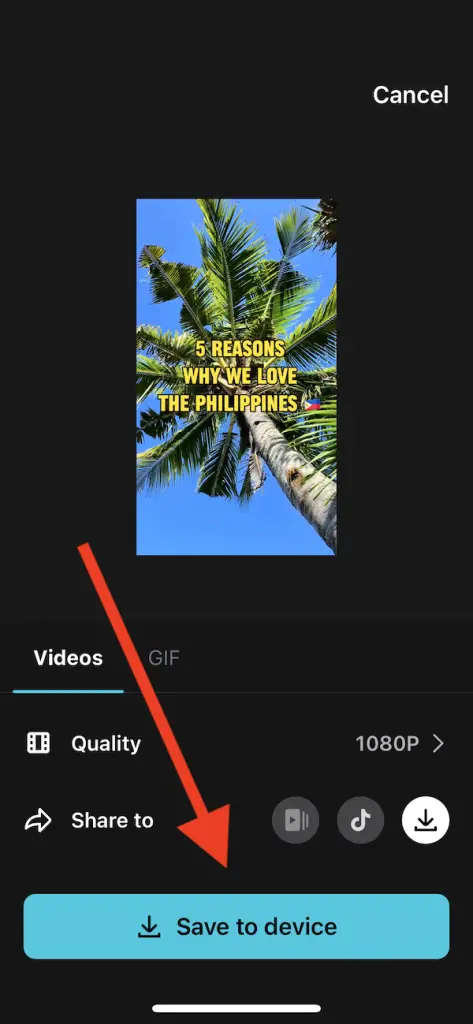
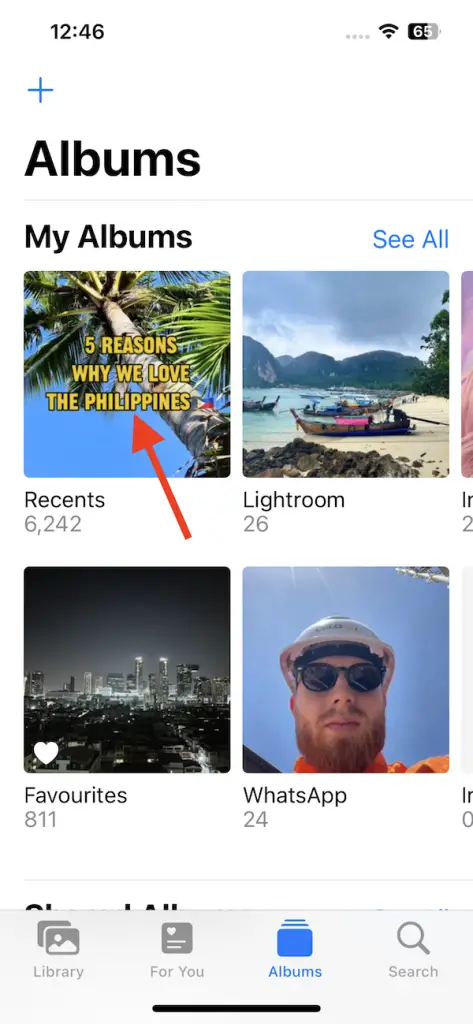
On a mobile device your CapCut videos are saved within your camera roll, ensuring easy access.

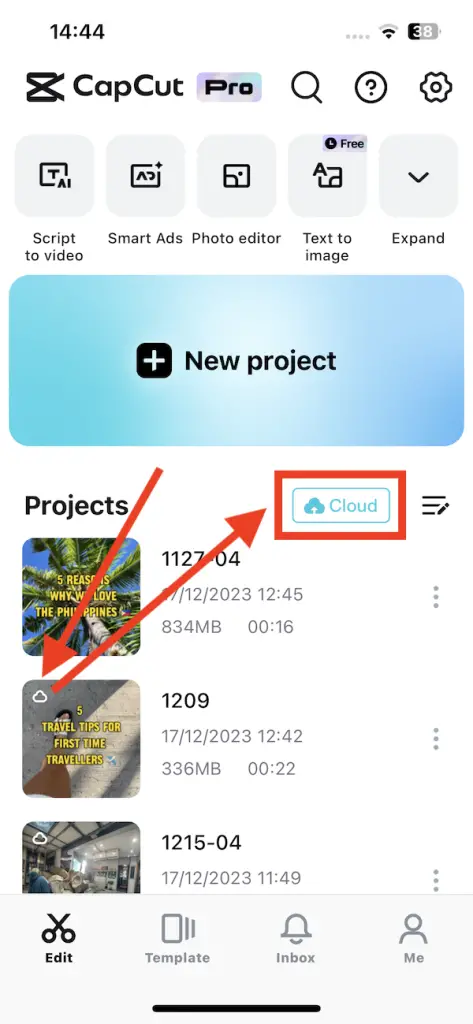
Additionally, all of your projects are located neatly under the “Projects” section on the Edit page. CapCut goes the extra mile by automatically saving your projects to the cloud within the app, provided you have auto-upload enabled and a stable internet connection. To confirm whether a video has been successfully uploaded to the cloud, simply check the top left of your project preview screen for the cloud icon.

Where does Capcut save videos on the Desktop App?

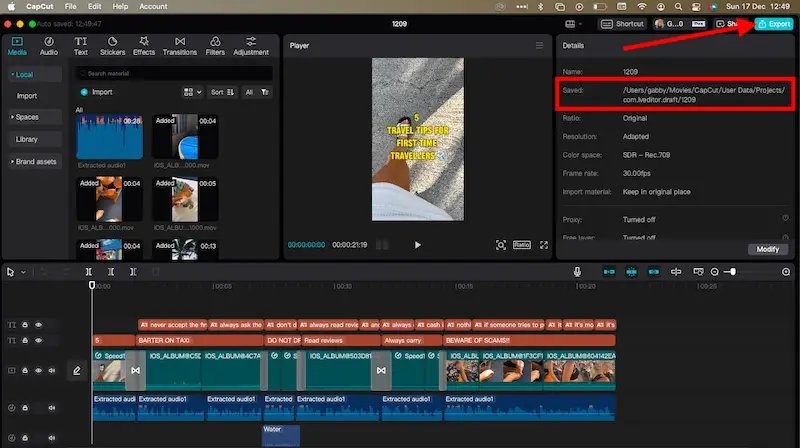
On the desktop app, CapCut automatically creates a designated folder and saves your videos under your user account.

You can find all your exported videos under /User/YourName/Movies/CapCut/User Data/Projects/com.Iveditor.draft. 

How do you save a video from CapCut in the Desktop App?

Saving video in the desktop app is just as simple as the mobile: 

  1. Click the Blue Export button located in the top right of your screen.
  2. Fill in the Title field with your desired name.
  3. Check the Export to field is set to the area where you want your video saved too.
  4. Adjust the Video exporting fields to your desired specifications. Here you can select Resolution, Bit rate, Codec, Format and Frame rate.
  5. Adjust Export audio and Caption exporting to your desired specification. 
  6. Click the blue export button in the bottom right corner of the Export box.

How to save a video on CapCut without the watermark?

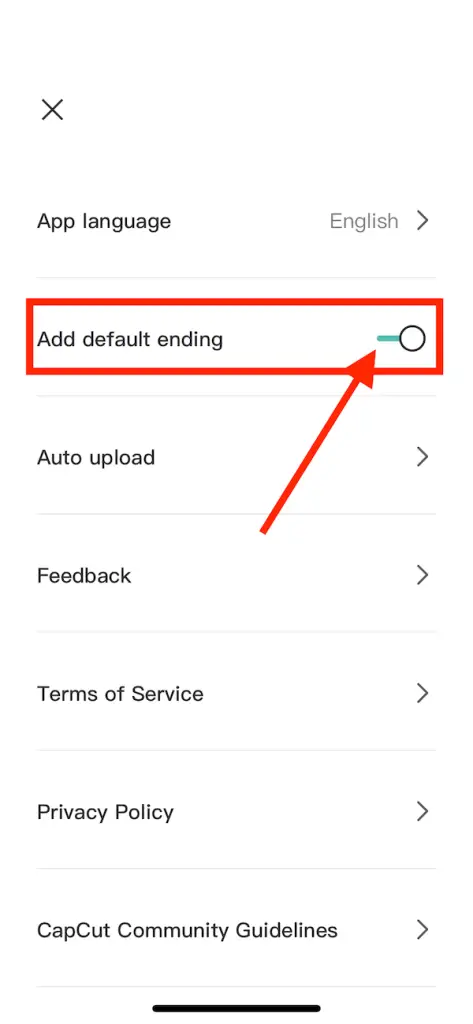
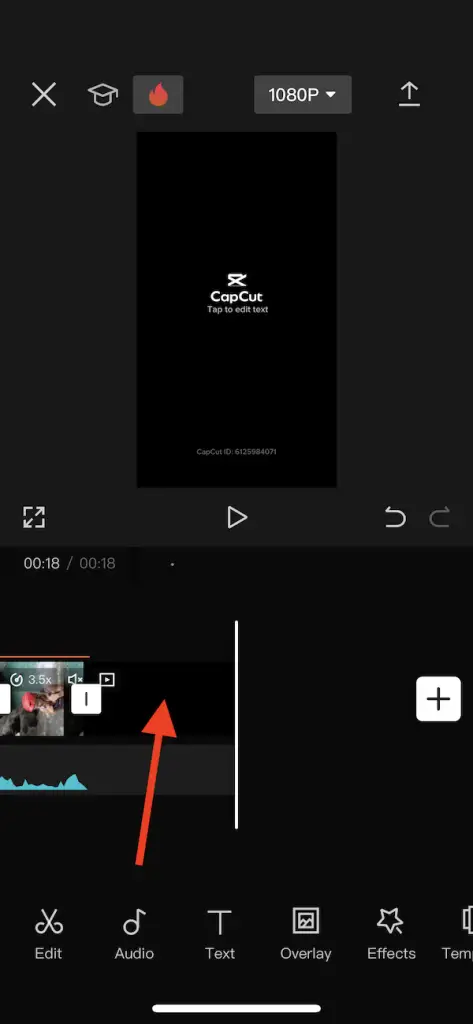
CapCut automatically integrates its watermark into your project by appending a black screen featuring their logo to the end of all your projects. 

While their intent may be innocent – aimed at promoting their software – the CapCut watermark can inadvertently detract from your content, compromising the aesthetic of your video. Fortunately, there are two effective methods to successfully remove the CapCut watermark.

Adjust your Settings

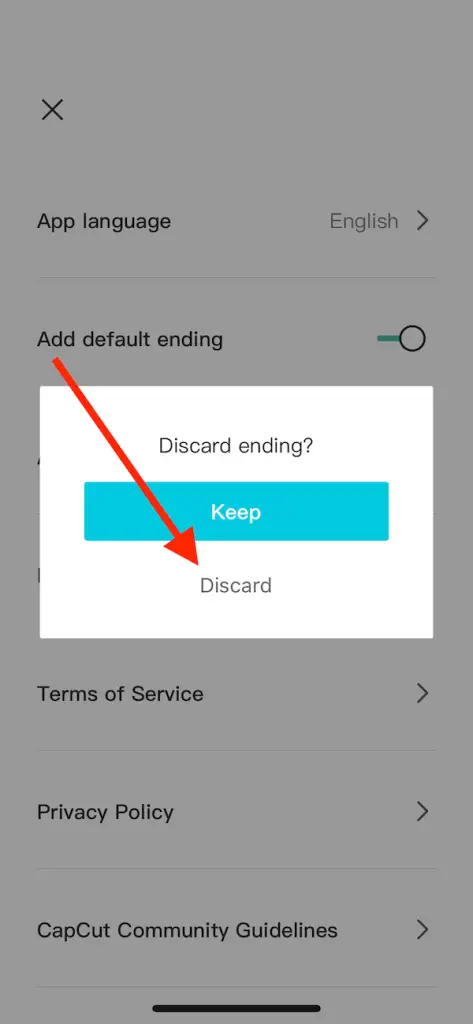
The best way to remove the automated watermark is by adjusting your CapCut settings. It is very easy to do, simply:

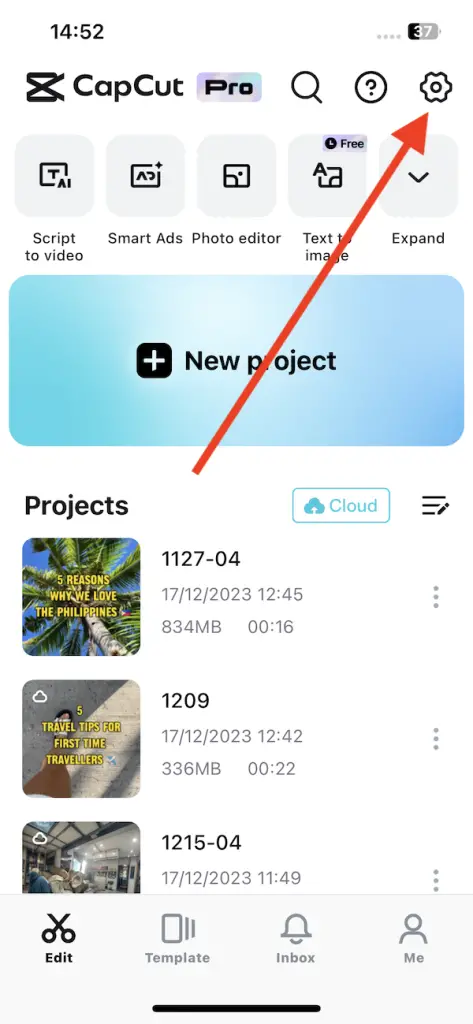
  1. Click the Settings button (Black Cog Icon) at the top right of your screen.
  2. Toggle the Switch for ‘Add default ending’ from right to left. 
  3. A box will pop up asking ‘Discard ending’ select ‘Discard’.

Manually Delete the End Clip

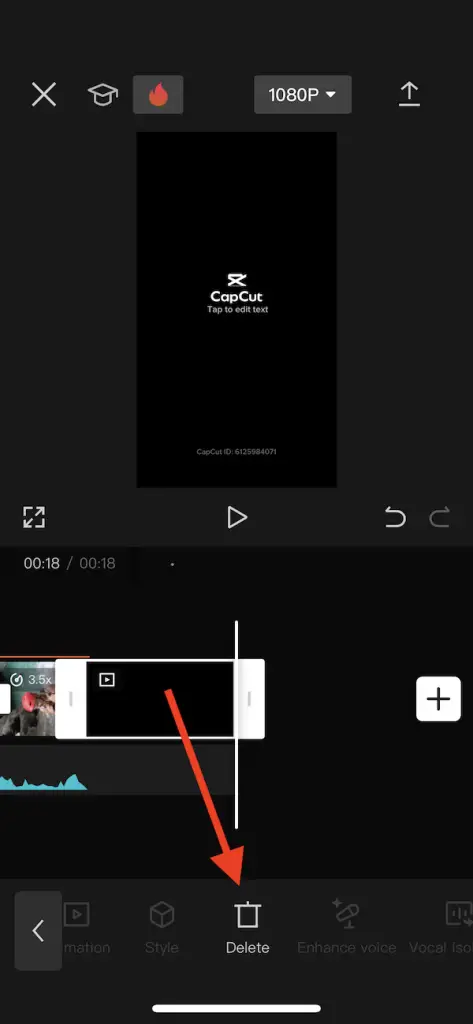
If you opt not to adjust your settings, you can still manually remove the black logo screen at the end of your video by:

  1. Scroll to the end of your video’s timeline.
  2. Select the black ending clip by clicking.
  3. The ‘Edit’ bar will automatically open revealing different icons.
  4. Swipe to the left to reveal the Delete (waste bin icon) button.
  5. Click Delete.
7 Fixes For Adobe Premiere Pro ‘Out Of Memory’ Error

Adobe’s “out of memory” error is every video editor’s worst nightmare, but what does it actually mean, and why does it happen?

The “out of memory” error in Premiere Pro appears when your memory is full and is typically caused by excessive media cache or insufficient RAM being allocated to the app. Clearing your media cache is the quickest and easiest way to fix this error.
Several other issues have also been known to make the dreaded error surface. Below we detail seven common causes and simple fixes you can use when Premiere Pro is out of memory:

1. Delete your media cache

Premiere pro automatically creates cache files from your media.  A cache file acts as a computer’s short-term memory, storing reduced-quality duplicates of your frequently used files to boost retrieval speed. The problem posed is that after a while they build up and hog all of your memory storage.

To prevent your cache from getting too packed, it’s essential to regularly clean out your media cache. Here’s a quick guide on how to do it:

  1. Go to the Premiere Pro Tab located at the Top Left of your screen.
  2. Choose Preferences from the pop-up list.
  3. Head to the Media Cache Tab.
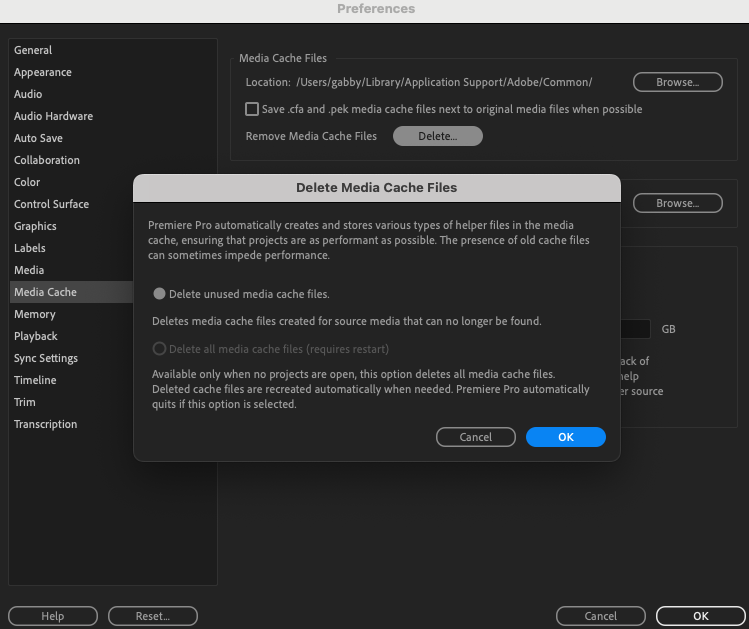
  4. Click on the Delete button to get rid of unnecessary cache files.
  5. Close the program and then try reloading your project.

    BONUS TIP: You can set up automatic media cache clearing under Media Cache Management.
screenshot of media cache page in preferences

2. Allocate enough RAM

In order to run smoothly, Premiere Pro relies heavily on RAM (Random Access Memory). If it doesn’t have enough RAM allocated, you’ll encounter the ‘out of memory’ error. Adjusting the memory settings to give Premiere Pro more access to RAM can prevent this error from occurring.

Premiere Pro will operate with only 8GB of RAM but it’s recommended to have at least 16GB for optimal performance. You can find the latest Adobe Premiere Pro System Requirements here.

To adjust your allocated RAM:

  1. Tap the Premiere pro button at the top left of your screen.
  2. Scroll down and hit Preferences
  3. Navigate to the Memory tab
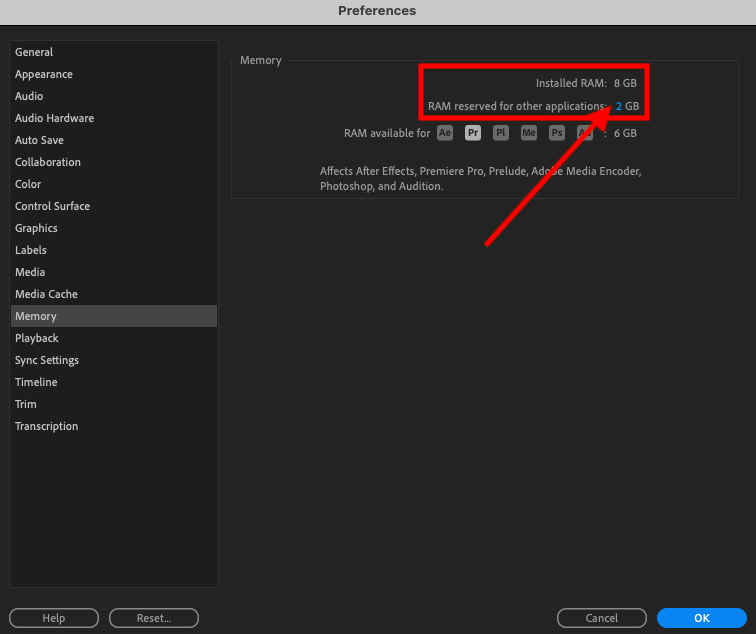
  4. Click on the number next to ‘RAM reserved for other applications’ and type in your desired amount. Remember the maximum amount you can allocate is your ‘installed RAM” number which is shown above.
  5. To save your changes, hit Ok.
screenshot of memory page in preferences

3. Close down other apps

Close all other applications when using Premiere Pro to ensure optimal performance. Since Premiere Pro demands significant RAM, shutting down competing programs prevents resource conflicts, contributing to a smoother editing experience without slowdowns or potential glitches.

You can quickly shut down any unnecessary background programs through your task manager. To access your task manager follow the steps below:

For Mac users
Press CMD + ALT + ESC simultaneously to access and force quit specific applications.

For Dell users
Press CTRL + SHIFT + ESC together to open the Task Manager.

Screenshot of Force Quit Applications

4. Upgrade your memory

If you’re a full-time content creator or video editor, it’s crucial to assess whether your current system meets the premiere pro minimum software requirements. While the minimum RAM for Premiere Pro is 8GB, it’s advisable to aim for at least 16GB for optimal performance. 

Upgrading your RAM can significantly enhance your editing experience and ensure smoother operation of Premiere Pro, especially when working on resource-intensive projects.

5. Check your software version

Occasionally, Premiere Pro encounters bugs. To address this, Adobe developers frequently release updates containing bug fixes and performance enhancements.

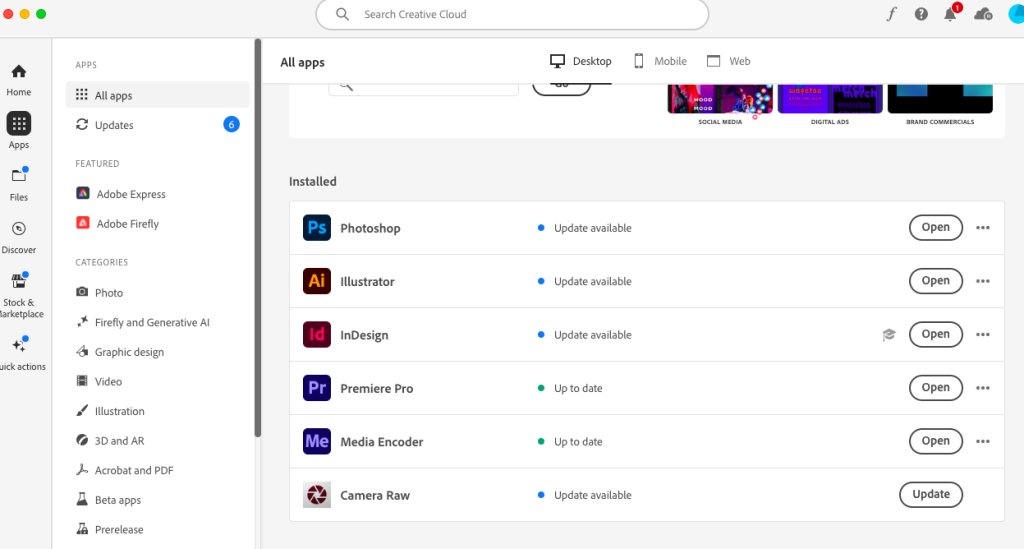
Make sure to keep an eye on your Creative Cloud app for updates. To check, head to the ‘all apps’ page. If there’s a newer version available, you’ll spot it marked with a blue dot and ‘update available’.

Screenshot of the all apps page in adobe creative cloud

6. Delete your rendered files

Adobe stores your rendered files in a dedicated folder, and over time, these files can accumulate, occupying a significant portion of your memory storage. Deleting unnecessary rendered files is an effective method to reclaim storage space and eliminate the ‘out of memory’ error message. 

To delete your rendered files:          

  1. Tap the Sequence button located at the top of your screen.           
  2. Scroll down to ‘Delete render files’

7. Move files to external drive

To prevent your internal storage from filling up, the best step you can take is to organize and store files on an external drive. Transfer as many files as you can from your internal drive to an external one by simply dragging and dropping them between the drives. This helps free up space and ensures your system has ample storage for smooth operation.

Here are 5 preventive steps you can take to avoid your Premiere Pro running out of memory:

1. Render Sequence changes

Frequently rendering your sequence changes as you work on a project can help reduce the amount of memory storage you use in premiere pro. 

Adobe incorporates a smart feature in your timeline that color-codes clips—yellow indicates real-time playback capability, red signifies a lack of real-time playback due to numerous effects. After rendering, these clips transition to a green color in your timeline.

To render sequence changes:

  1. Hit the Sequence button in the Project panel.
  2. Press the enter key. Premiere pro will automatically render any red labeled clips.

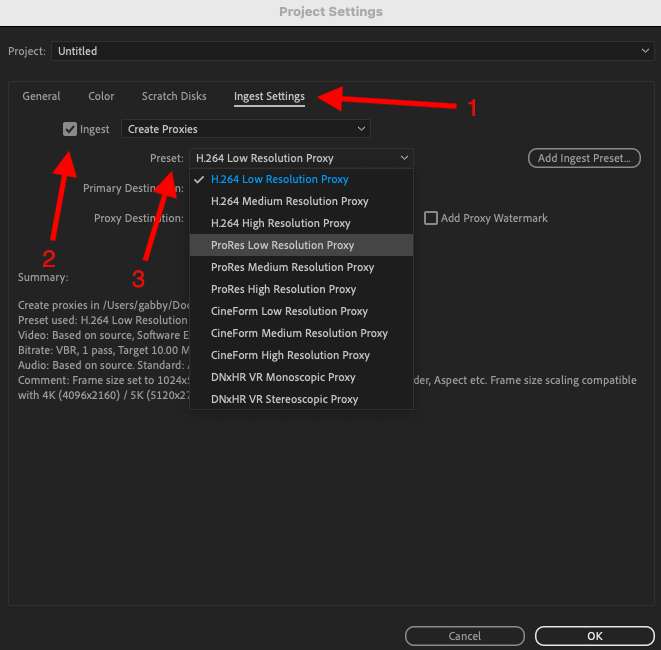
2. Use Proxies

Work with proxies for large files. Proxies are scaled-down versions of your media, easing the burden on your system and avoiding crashes. Using proxies in Adobe Premiere Pro is a straightforward process.

To setup proxies:

  1. Tap File > Project Settings > Ingest Settings.
  2. Check the Ingest box and choose Create Proxies from the dropdown list.
  3. Pick your preferred “Preset.” 
  4. Now, Media Encoder will automatically generate proxies for any raw footage you import into Premiere Pro.
Screenshot of project settings

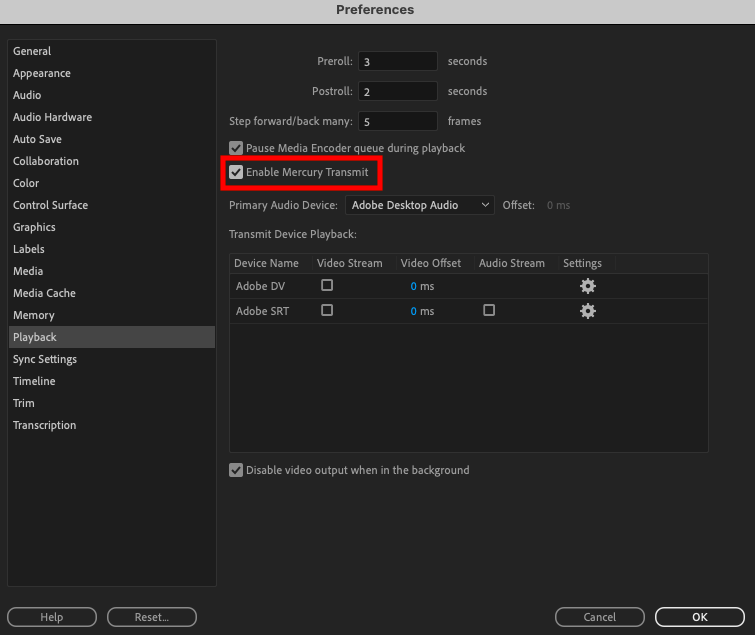
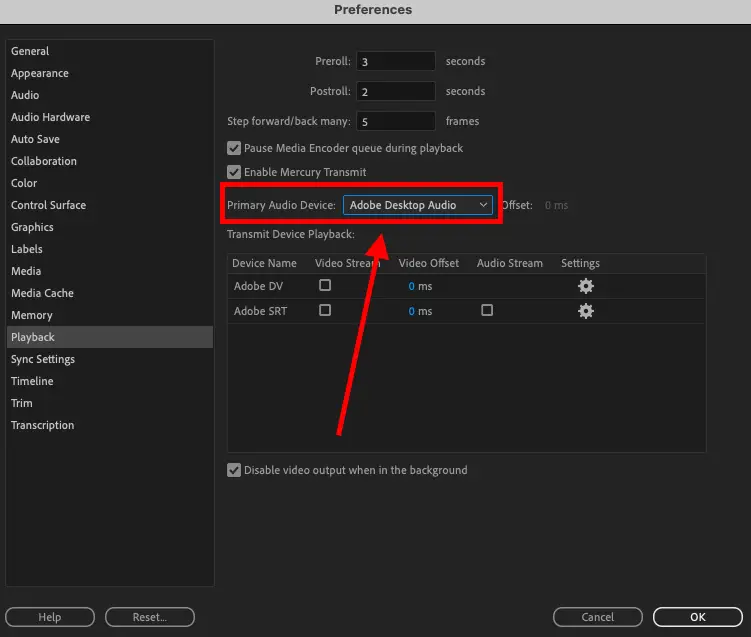
3. Disable Mercury Transmit

Mercury Transmit is a feature within Premiere Pro that enhances video playback by redirecting output to external monitors. It is particularly valuable for professional video editing as it ensures precise color representation and efficient monitoring.

However it is known to trigger the out of memory error. If you are not working with external monitors then you can turn mercury transmitting off to increase software performance and avoid premiere pro running out of memory.

You can disable mercury transmit using the following steps:

  1. Click the Premiere Pro button
  2. Scroll to Preferences
  3. Select the Playback tab
  4. Untick the checkbox next to Enable Mercury Transmit.
Screenshot of the Playback page in Preferences

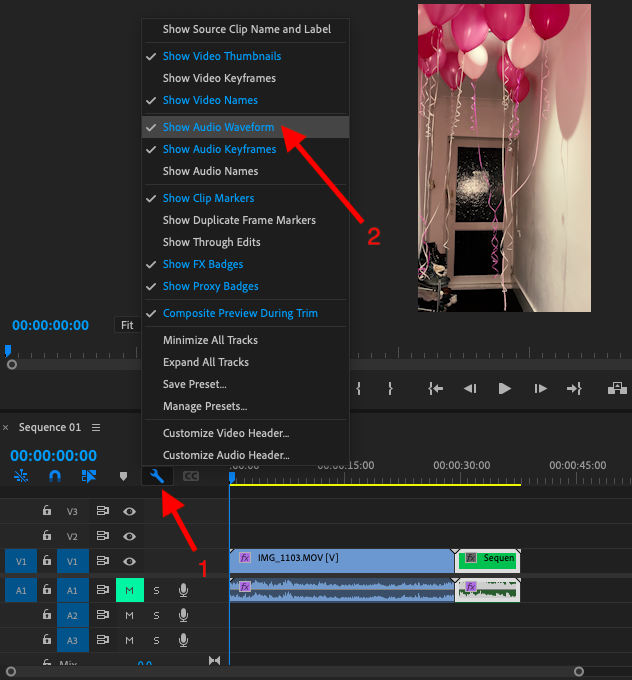
4. Turn off Waveform

The waveform graph in your timeline displays volume changes, serving as a visual representation of audio signals. It’s useful for syncing audio and spotting silent parts in your video, but it can contribute to your memory storage depleting sooner.

If you are not leveraging the waveform graph then you can turn this off to save memory storage space.

To turn Waveforms off:

  1. Click on the small wrench icon to open menu
  2. Unselect the tick next to Show Audio waveform
Screenshot of the timeline in adobe

5. Check for memory leaks

A memory leak is a programming error where a computer program fails to release memory it no longer needs, causing a gradual accumulation of unused memory. Over time, this can lead to unresponsiveness and eventually drain your memory storage. 

There is no foolproof way to completely avoid this but to minimize the risk you should consistently close Premiere Pro after use and actively monitor your storage space.

Adobe Premiere Pro Audio Not Working? 5 Simple Fixes

Has your audio in Premiere Pro stopped working, leaving you puzzled and frustrated?

The two most common reasons for audio issues in Premiere Pro are typically either incorrect Audio Hardware settings or a muted audio track layer. Whether the hardware settings need adjusting or the audio track layer is accidentally muted, identifying and addressing these issues can swiftly restore the audio functionality.

Here are 5 quick & easy fixes for when your Premiere Pro audio is not working. 

1. Check your volume settings

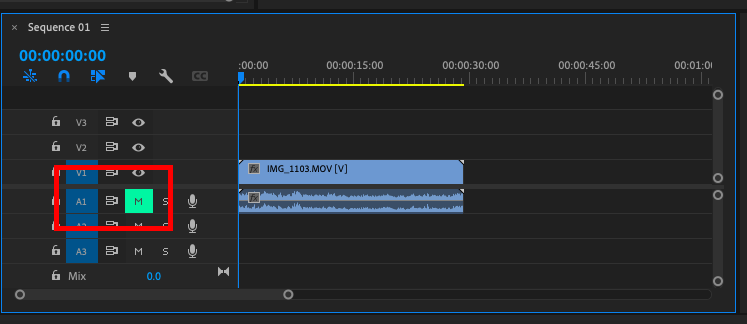
Naturally, you have probably tried turning the volume up on your device. However Premiere Pro has several different volume controls within the software that could be preventing your audio from working. The most common issue is that your audio track is muted. 

You can check if the audio track is muted by looking at the left hand side of your timeline. If the audio track is muted then a box will appear around the M on the audio track line. Simply unmute the audio track in the timeline by clicking the M box. Once the highlighted box disappears the audio should resume functionality.

Screenshot of audio track in the timeline.

2. Check the audio hardware settings

If your audio hardware settings are misconfigured then you may encounter audio problems. Switching between using headphones and speakers can sometimes cause your audio settings to be incorrectly adjusted. Without the correct settings, Adobe will not be able to register which output to play the audio.

You can check your audio hardware settings are correct by: 

  1. Clicking the Premiere Pro Tab at the Top Left of your screen
  2. Selecting Preferences from the pop up list
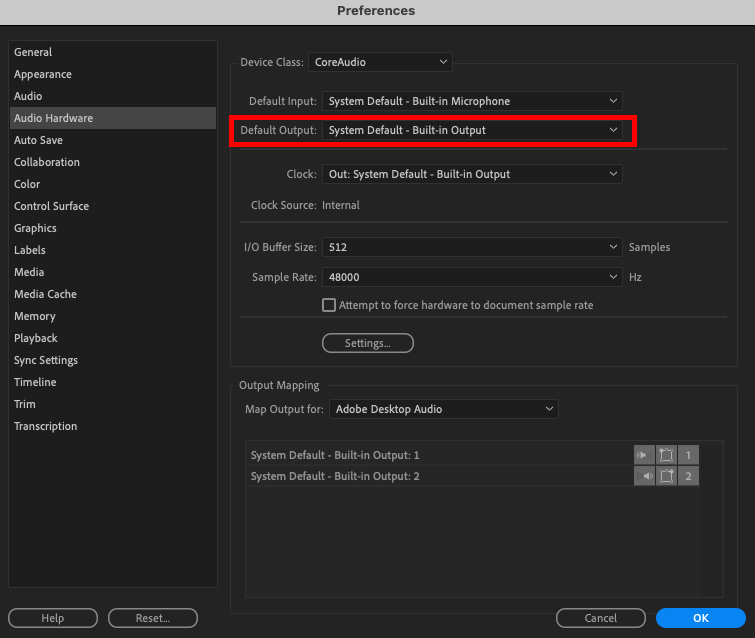
  3. Navigating to the Audio Hardware Tab
  4. Check that the Default Output drop down is correctly selected as your desired device. 
Screenshot of the Audio Hardware tab in Preferences page.

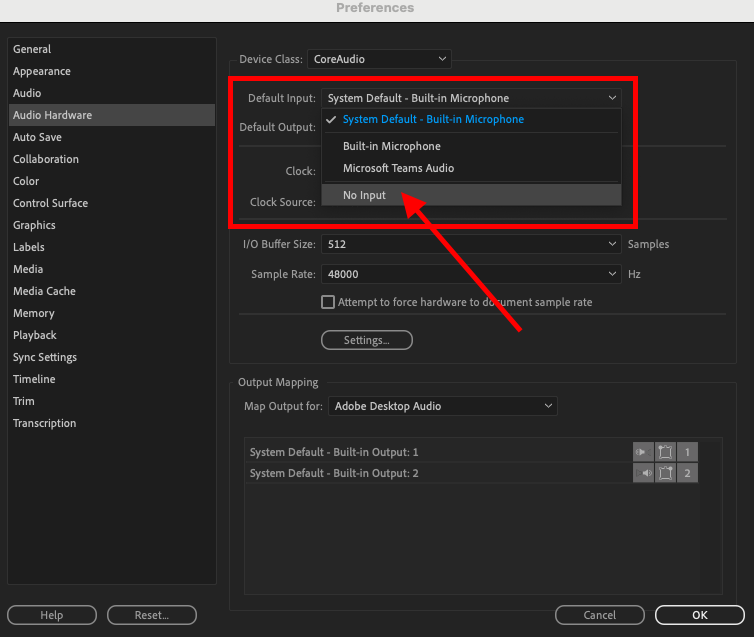
QUICK TIP: If this still doesn’t solve the audio issue then a proven solution is to select ‘No Input’ from the Audio Input dropdown menu.

Screenshot of the Audio Hardware tab in Preferences page.

3. Clear your media cache

A cache file is a temporary storage that stores frequently accessed data, improving system or application performance by allowing quicker retrieval. Premiere Pro automatically creates these cached files for your imported media, however after a while these files compound and can cause the software to lag and prevent the audio from functioning.

To stop your cache from becoming too full you need to regularly clear your media cache. Here’s how to do that: 

  1. Click the Premiere Pro Tab at the Top Left of your screen.
  2. Select Preferences from the pop up list
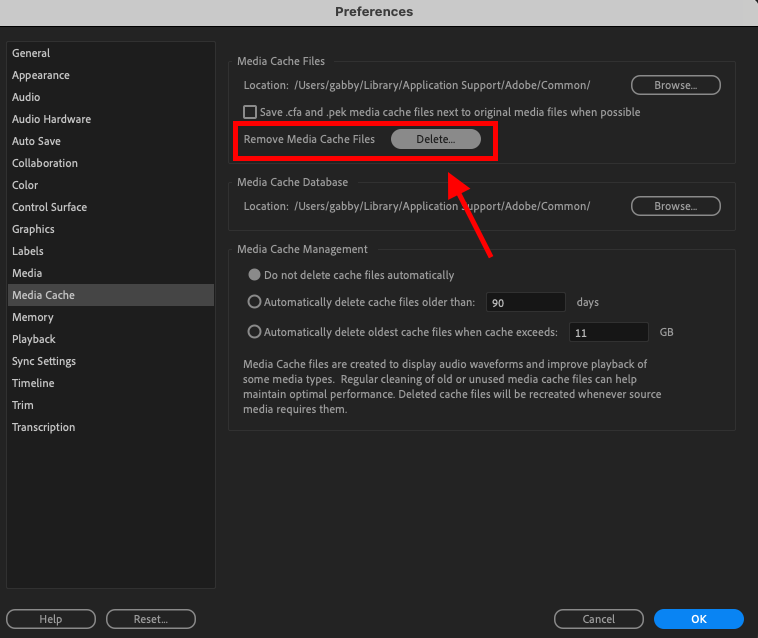
  3. Navigate to the Media Cache Tab.
  4. Click on the ‘Delete’ button to remove unnecessary cache files. 
  5. Exit the program and try reloading your project.
Screenshot of Media Cache tab in Preferences page.

4. Relaunch the Adobe app

Premiere Pro is a demanding software that requires a lot of RAM. Having Premiere Pro open for extensive lengths of time can cause the system to overheat and crash which may cause temporary loss of audio.

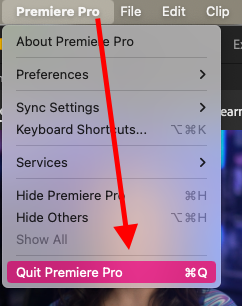
An often overlooked solution is to completely close and reopen the app. This can potentially solve a lot of issues relating to adobe premiere pro audio not working.

Screenshot of Premiere Pro dropdown menu.

5. Review your playback preferences

Playback preferences are an important setting in Premiere Pro that controls the way your media files are played during post-production. If your playback preferences are set up incorrectly then your audio may stop working.

Here is how you can check your playback preferences :

  1. Select the Premiere Pro Tab at the top left of your screen.
  2. Tap Preferences from the pop up menu
  3. Click the Playback Tab
  4. Ensure Primary Audio Device field has ‘Adobe desktop audio’ selected.
Screenshot of Playback tab in Preferences page.

How Long Am I Blocked For Commenting On YouTube?

0

So, you’ve been blocked for commenting on YouTube videos but don’t know how long this suspension will last? 

In a temporary block, you’ll be banned for 24 hours for commenting on any YouTube video. However, if you continue to violate the platform’s community guidelines, you’ll get yourself permanently blocked from commenting on YouTube, which in some cases, can last from 3 to 6 months. 

In this article, we’ll explain how long you are blocked from commenting on YouTube and how you can get yourself out of this situation.

How long am I blocked for commenting on YouTube?

How long am I blocked for commenting on YouTube

If you’ve been blocked for commenting on YouTube, the duration may depend on the type of ban the platform imposed on you.

Temporary Ban

When you post abusive comments on YouTube, you’ll get a warning that you have violated the Community Guidelines. The platform will also remove your comment from the video content. 

If you continue posting inappropriate comments on YouTube, you’ll face a “Timeout” or temporary shadow-ban on your account. Due to this, you won’t be able to comment on any YouTube video for the next 24 hours. 

Permanent Ban

YouTube may ban you permanently for commenting on videos if you repeatedly violate its community guidelines or Terms of Service. This includes: 

  • Posting hateful content.
  • Sharing marketing links. 
  • Repeating the same comments on one or different YouTube videos.
  • Using too many unusual characters or emojis in your comments. 
  • Commenting a lot in a short span of time.

NOTE: Some users even report that YouTube blocked them from commenting on any video or channel for 3 to 6 months. 

Why is YouTube not allowing me to comment?

Why is YouTube not allowing me to comment

Here are some of the reasons why YouTube is not allowing you to comment on videos:

  • Community guidelines violation.
  • Restricted mode is enabled on your YouTube account.
  • Using VPN service.
  • Commenting is not allowed by the creator of the YouTube video.
  • Ad-blocker extensions conflicting with YouTube web page. 
  • Expired or corrupt YouTube browser cache.

How do I unblock commenting on YouTube?

How do I unblock commenting on YouTube

To unblock commenting on YouTube, try these 5 simple and easy methods to fix this problem quickly.

Submit an Appeal

If you believe that you’ve not violated any community guidelines and YouTube still banned/blocked you from commenting on videos for an invalid reason, submit an appeal to the support team by filling out the Google Form this way:

  • Open the Google Account Help website.
  • Select “Help Center.”
  • Alternatively, go to the “Unable to Access a Google Product” page.
  • Enter your full name, email, and the URL of your YouTube account in the given fields.
  • In the next field, briefly explain that YouTube has blocked you from commenting.
  • Click/tap “Submit.”
Unable to access Google Product page

Now, wait for the YouTube team to review your appeal and uplift the commenting ban. 

In case YouTube does not respond to your appeal or reject it, your only option is to create and use a new Gmail account on YouTube. Here’s how:

YouTube Mobile App:

  • Open the “YouTube” app.
  • Select “You.”
  • Tap “Switch Account.” 
  • Select the “+” icon in the pop-up window.
  • Type in your new details to create your new Gmail account and switch to it on YouTube.

YouTube Desktop:

  • Open “YouTube.”
  • Select your profile.
  • Click “Switch Account.”
  • Choose “Add Account.”
  • Enter your name, email, password, and other details to create a new Gmail account on YouTube.

Once you do that, open a video or channel on YouTube and check whether you can comment on it now.

NOTE: If a creator has turned off the commenting feature, YouTube will block you from posting any comments on their videos, and unfortunately, there is nothing you can do about it.

Turn Off Restricted Mode

YouTube allows you to enable “Restricted Mode” on your account to hide adult videos. However, this mode also restricts or blocks you from commenting on certain content. 

To prevent this, turn off the “Restricted Mode” by following these simple instructions:

  • Open “YouTube.”
  • Tap “You.”
  • Tap the gear icon.
  • Choose “General.”
  • Toggle off “Restricted Mode.”
Turning off restrictive mode on Youtube

YouTube Desktop/Browser:

  • Open “YouTube” or go to its official website.
  • Click your profile.
  • Select “Restricted Mode.”
  • Toggle off “Activate Restricted Mode.”

Next up, re-open the app or refresh the YouTube page, and confirm if you can comment on videos now.

Disable VPN Service

If you are using a VPN on your device, YouTube often detects it and throws the “Comment Failed to Post” error message on the video. 

To fix this problem, disconnect the VPN service on your mobile device or computer and check whether you can leave a comment. 

Disable Browser Extensions

Sometimes, the ad-blocker extensions on your browser may block essential scripts necessary for commenting on YouTube videos. For this reason, the platform throws an error message while you try to post a comment.

But don’t worry! You can fix this issue by turning off the ad-blocker extensions on your browser (Chrome). Here’s how:

  • Open “Google Chrome.”
  • Click the three dots.
  • Go to “Extensions” > “Manage Extensions.”
  • Toggle off adblocker extensions.

Now, press “F5” to refresh the YouTube page and verify the fix. 

Clear Browser Cache 

Another solution to remove the block or restriction for commenting on YouTube is to clear the browser cache on your PC. Here’s how:

  • Open “Chrome.”
  • Click the three dots.
  • Choose “More Tools.”
  • Choose “Clear Browsing Data.”
  • Select the time range.
  • Check “Cached Images and Files.”
  • Click “Clear Data.”

Afterward, open the browser again and go to the YouTube website. Hopefully, it won’t block you from commenting on videos. 

If you are experiencing this problem on the YouTube mobile app, clear its cache data through the device’s Settings.

NOTE: A corrupt app cache might also cause a YouTube sound rendering issue.

Conclusion

In this article, we’ve answered how long you’ll be blocked for commenting on YouTube. We’ve also discussed why YouTube is not allowing you to comment on a video and what steps you can take to fix this problem. 

Hopefully, you’ve got all the valuable insights and can now engage with the creators and commenters of your favorite YouTube videos without any issues.

7 Quick Fixes For Adobe Premiere Pro Quit Unexpectedly

Is Adobe Premiere Pro quitting on you unexpectedly? Are you ready to throw your computer out the window? We don’t blame you, but thankfully in this article you can learn why Premiere Pro is quitting on you and how to fix it.

Why is Adobe Premiere Pro Crashing?

Adobe Premiere Pro can crash for various reasons, but it’s often tied to the software’s demands on your system. If you frequently encounter crashes, you should consider the 7 following common issues and fixes:

1. Outdated Premiere Pro

Running an outdated version of Premiere Pro can lead to instability and crashes.

Fix: Check your Creative Cloud application for updates. You can see if a newer version is available by navigating to the ‘all apps’ page. If a newer version is available, you will see the software status as a blue dot and ‘update available’. You should upgrade to it promptly to benefit from bug fixes and stability improvements. 

Screenshot of Creative Cloud All Apps page

2. Not Using Proxies

Handling large file sizes directly without proxies can overwhelm your system, causing crashes.

Fix: Utilize proxies when working with large files. Proxies are lower-resolution versions of your media files, reducing the strain on your system and preventing crashes. Using Proxies in Adobe Premiere Pro is extremely easy to do. Simply just navigate to File>Project Settings>Ingest Settings. Tick the Ingest box and select Create Proxies from the drop down list. Then select your desired “Preset”. This will ensure that Media encoder will now automatically create proxies for any raw footage you put into Premiere Pro.

Screenshot of Project Settings Ingest Settings page

3. Need to Clear Your Media Cache

Accumulated cache files can bloat and potentially lead to crashes. 

Fix: Regularly clear your media cache. Navigate to Premiere Pro > Preferences > Media Cache, and click on the ‘Delete’ button to remove unnecessary cache files.

Screenshot of Preferences Delete Media Cache Page

4. GPU Driver is Outdated

Outdated or incompatible GPU drivers may cause Premiere Pro to crash.

Fix: If you are using a mac then your system should automatically be updated. 

For alternative systems you should visit the website of your GPU (Graphics Processing Unit) manufacturer and ensure you have the latest drivers installed. Open Device Manager on your system and cross reference the GPU driver model against the manufacturers. Keeping your GPU drivers up to date can resolve compatibility issues.

Screenshot of Software Update page

5. Your System Does Not Meet the Minimum Requirements

If your system falls below Premiere Pro’s minimum requirements, crashes are likely.

Fix: Upgrade your system components to meet or exceed the software’s minimum requirements. This may include increasing RAM, updating your GPU, or upgrading your CPU. Currently Adobe premiere pro requires a 64-bit multi core processor, a minimum of 16 GB RAM and at least 4GB GPU VRAM. The Software also needs to be compatible with operating systems like Windows 10 Version 22H2 or macOS version 12.0 or newer.

You can find the latest Adobe Premiere Pro System Requirements here.

6. Background Programs

Running memory-intensive programs simultaneously can lead to crashes.

Fix: Close any unnecessary background programs using your task manager. This ensures that Premiere Pro has the maximum available resources to operate smoothly.

If you are using a mac then you can access this by simultaneously pressing down CMD + ALT + ESC keys. You can then select which applications you want to force quit.

If you are using a Dell device then you can access the Task Manager by simultaneously pressing down CTRL + SHIFT + ESC keys.

Screenshot of Force Quit Applications page on Mac

7. System is Overheating

Your System Overheating can lead to system instability and crashes.

Fix: Use a cooling pad under your laptop or monitor to help maintain optimal operating temperatures. 

You should also ensure your computer’s vents are free from dust. 

How to Protect Your Work if Premiere Pro Quits Unexpectedly 

While you can take steps to prevent crashes, unexpected incidents may still occur. To safeguard your work:

Enable Auto Save: Set your Premiere Pro preferences to auto-save your project every few minutes. This minimizes potential data loss and preserves your hard work.

Can You Recover Your Work if Premiere Pro Crashes?

Unfortunately, if you haven’t activated the auto-save feature and Premiere Pro crashes, recovering unsaved work becomes challenging. The best practice is to ensure auto-save is always turned on to mitigate the risk of losing valuable edits and projects.